Title: 29 Build Thread - Part 3
Post by: chetbrz on January 30, 2020, 10:12:38 AM
Post by: chetbrz on January 30, 2020, 10:12:38 AM
Year 4 Hopefully the conclusion of this project.
Just a recap for January. If weather permits, work continues :)
http://www.1948plymouth.info/1929/Work_files/2020/Jan-2020.htm (http://www.1948plymouth.info/1929/Work_files/2020/Jan-2020.htm)
Chet...
Just a recap for January. If weather permits, work continues :)
http://www.1948plymouth.info/1929/Work_files/2020/Jan-2020.htm (http://www.1948plymouth.info/1929/Work_files/2020/Jan-2020.htm)
Chet...
Title: Re: 29 Build Thread - Part 3
Post by: Russ T. Fender on January 30, 2020, 02:01:27 PM
Post by: Russ T. Fender on January 30, 2020, 02:01:27 PM
Great progress. You are about a year ahead of me in my restoration so your well documented progress is very helpful.
Title: Re: 29 Build Thread - Part 3
Post by: frankp on January 31, 2020, 12:44:26 AM
Post by: frankp on January 31, 2020, 12:44:26 AM
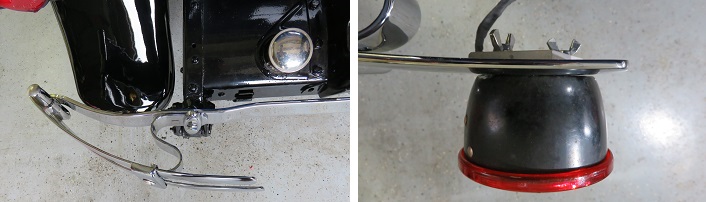
Superlative, Chet! A reminder to have a good ground to your lamp housings. frank
Title: Re: 29 Build Thread - Part 3
Post by: chetbrz on January 31, 2020, 08:49:27 AM
Post by: chetbrz on January 31, 2020, 08:49:27 AM
Quote from: frankp on January 31, 2020, 12:44:26 AM
Superlative, Chet! A reminder to have a good ground to your lamp housings. frank
Thanks Frank I got it covered. I run additional ground wire for all lamps unless impeccable continuity to ground. :)
Russ, Glad you see some value in my compulsive rambling.
Title: Re: 29 Build Thread - Part 3
Post by: racertb on January 31, 2020, 02:29:20 PM
Post by: racertb on January 31, 2020, 02:29:20 PM
It's certainly coming together!
Title: Re: 29 Build Thread - Part 3
Post by: chetbrz on February 14, 2020, 10:27:07 AM
Post by: chetbrz on February 14, 2020, 10:27:07 AM
Details, details.
Making slow but steady progress :)
Click the link below for the blow by blow.
http://www.1948plymouth.info/1929/Work_files/2020/02142020.htm (http://www.1948plymouth.info/1929/Work_files/2020/02142020.htm)
Chet...
Making slow but steady progress :)
Click the link below for the blow by blow.
http://www.1948plymouth.info/1929/Work_files/2020/02142020.htm (http://www.1948plymouth.info/1929/Work_files/2020/02142020.htm)
Chet...
Title: Re: 29 Build Thread - Part 3
Post by: frankp on February 14, 2020, 08:49:22 PM
Post by: frankp on February 14, 2020, 08:49:22 PM
Very creative Chet! May have to borrow your idea.
Title: Re: 29 Build Thread - Part 3
Post by: Marc28plym on February 15, 2020, 06:00:39 AM
Post by: Marc28plym on February 15, 2020, 06:00:39 AM
Looking good!
Title: Re: 29 Build Thread - Part 3
Post by: chetbrz on February 15, 2020, 09:15:05 AM
Post by: chetbrz on February 15, 2020, 09:15:05 AM
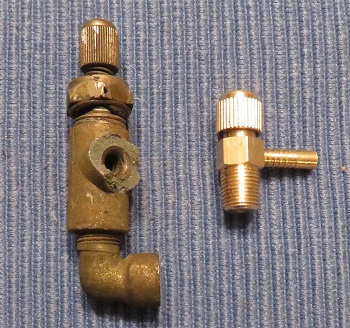
Quote from: frankp on February 14, 2020, 08:49:22 PM
Very creative Chet! May have to borrow your idea.
Hi Frank
I assume you mean the vacuum valve. Had to do something. I need to pass a one time inspection and the windshield wiper has to be functional. The only other solution would be electrical and that just wouldn't be right. Actually the exterior on/off valve would possibly be OK for inspection but still not correct for the car. The aquarium air valve fits the 3 'F' test. Form - close, Fit - acceptable, Function - right on. Can't beat the price.
Cheers, Chet
Title: Re: 29 Build Thread - Part 3
Post by: chetbrz on February 22, 2020, 05:39:51 PM
Post by: chetbrz on February 22, 2020, 05:39:51 PM
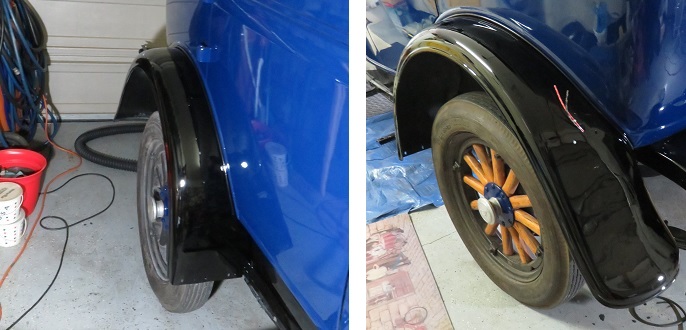
Starting to look like a car again.
Making slow but steady progress :)
Click the link below for the blow by blow.
http://www.1948plymouth.info/1929/Work_files/2020/02222020.htm (http://www.1948plymouth.info/1929/Work_files/2020/02222020.htm)
Chet...
Making slow but steady progress :)
Click the link below for the blow by blow.
http://www.1948plymouth.info/1929/Work_files/2020/02222020.htm (http://www.1948plymouth.info/1929/Work_files/2020/02222020.htm)
Chet...
Title: Re: 29 Build Thread - Part 3
Post by: Marc28plym on February 23, 2020, 10:40:48 AM
Post by: Marc28plym on February 23, 2020, 10:40:48 AM
She's looking great!
Title: Re: 29 Build Thread - Part 3
Post by: racertb on February 26, 2020, 09:39:17 AM
Post by: racertb on February 26, 2020, 09:39:17 AM
On the home stretch!
Title: Re: 29 Build Thread - Part 3
Post by: chetbrz on February 26, 2020, 11:58:07 AM
Post by: chetbrz on February 26, 2020, 11:58:07 AM
Ted, I'm not sure about the home stretch but certainly rounding the last lap.
Title: Re: 29 Build Thread - Part 3
Post by: frankp on February 28, 2020, 06:09:12 PM
Post by: frankp on February 28, 2020, 06:09:12 PM
Chet, lookin' real good! I'm sure you'll put this extra day to good use.
Title: Re: 29 Build Thread - Part 3
Post by: chetbrz on March 10, 2020, 05:56:24 PM
Post by: chetbrz on March 10, 2020, 05:56:24 PM
Almost finished with all the Mechanical Work.
Making good progress :)
Many Thanks go out to Rich, < 29plycoup > for a headlamp plug to finish off my lights.
Quite a job getting the lights setup properly. Especially with 91 year-old parts.
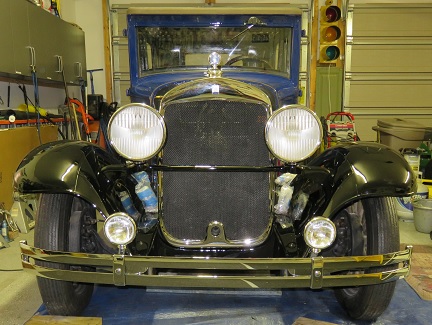
Click the link below for the blow by blow.
http://www.1948plymouth.info/1929/Work_files/2020/03102020.htm (http://www.1948plymouth.info/1929/Work_files/2020/03102020.htm)
Chet...
Making good progress :)
Many Thanks go out to Rich, < 29plycoup > for a headlamp plug to finish off my lights.
Quite a job getting the lights setup properly. Especially with 91 year-old parts.
Click the link below for the blow by blow.
http://www.1948plymouth.info/1929/Work_files/2020/03102020.htm (http://www.1948plymouth.info/1929/Work_files/2020/03102020.htm)
Chet...
Title: Re: 29 Build Thread - Part 3
Post by: frankp on March 10, 2020, 09:54:49 PM
Post by: frankp on March 10, 2020, 09:54:49 PM
Chet, Nice going with headlamps. Soldering those original parts is a memory. Like how you approached front turn signals. frank
Title: Re: 29 Build Thread - Part 3
Post by: rwollman on March 11, 2020, 05:39:53 AM
Post by: rwollman on March 11, 2020, 05:39:53 AM
chet- yes, the lights are a pain butt end result is worth it - I put the signal lights on the parking light bulb - just changed to a two contact setup - dont use the car at night so it doesnt bother.....had to install second tailight for everything to be in working order
Title: Re: 29 Build Thread - Part 3
Post by: chetbrz on March 11, 2020, 06:54:48 PM
Post by: chetbrz on March 11, 2020, 06:54:48 PM
Quote from: rwollman on March 11, 2020, 05:39:53 AM
chet- yes, the lights are a pain butt end result is worth it - I put the signal lights on the parking light bulb - just changed to a two contact setup - dont use the car at night so it doesnt bother.....had to install second tailight for everything to be in working order
I had a similar setup but just used the park light as a flasher. With the new wire harness everything can unplug and be removed easily, including the steering wheel switch. My rear lights just clamp to the rear bumper and plug into the wire harness. They are next with the rear bumper install. With everything unplugged the car will look and function as originally manufactured. I don't think this is an original idea in that YnZ's knew exactly what I wanted and reproduced the harness without error.
Hi Frank, Thanks for the at-a-boy.
Title: Re: 29 Build Thread - Part 3
Post by: chetbrz on March 14, 2020, 02:12:23 PM
Post by: chetbrz on March 14, 2020, 02:12:23 PM
The Rear Bumper & Lights
The bumper installed easily in comparison to the front bumper. Here again items that were originally black from the factory were chromed. May knock off a couple points at a POC show but looks to good to destroy the beautiful chrome finish and replace it with black paint.
My rear lights are part of the flasher system and provide running lamp, brake, and flasher function. In the picture above and to the right you can see that the light is held in place by an aluminum plate and two wing nuts. These lights can quickly be removed for an average car show. The picture below and to the left shows the standard trailer light plug which is beside the gas tank on the drivers side. Two tie wraps and the lights can be easily removed.
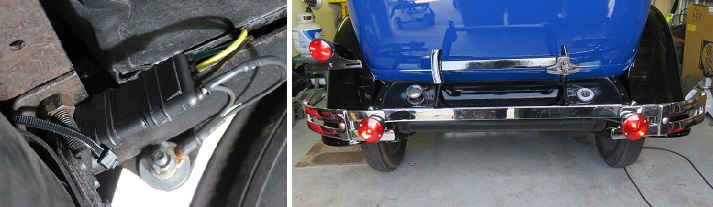
This concludes the exterior reassembly work. I need to finish installing the remaining glass and wire the overhead cabin light. Then we will start the interior. Headliner first, followed by the exterior roof surface, then the interior.
Chet...
The bumper installed easily in comparison to the front bumper. Here again items that were originally black from the factory were chromed. May knock off a couple points at a POC show but looks to good to destroy the beautiful chrome finish and replace it with black paint.
My rear lights are part of the flasher system and provide running lamp, brake, and flasher function. In the picture above and to the right you can see that the light is held in place by an aluminum plate and two wing nuts. These lights can quickly be removed for an average car show. The picture below and to the left shows the standard trailer light plug which is beside the gas tank on the drivers side. Two tie wraps and the lights can be easily removed.
This concludes the exterior reassembly work. I need to finish installing the remaining glass and wire the overhead cabin light. Then we will start the interior. Headliner first, followed by the exterior roof surface, then the interior.
Chet...
Title: Re: 29 Build Thread - Part 3
Post by: chetbrz on April 02, 2020, 02:30:17 PM
Post by: chetbrz on April 02, 2020, 02:30:17 PM
I hope everyone is staying safe.
These are very unusual times and it might be best to get away from the madness and concentrate on something you can do something about. If you are practicing social distancing at home.., it might be a good time to start that project you have been putting on the sidelines. Its hard to turn away from the news.., like a train wreck you just can't look away.., but accomplishing something might be better for your mental health.
Mechanical work done on to the Interior:

Click the link below for the blow by blow.
http://www.1948plymouth.info/1929/Work_files/2020/04022020.htm (http://www.1948plymouth.info/1929/Work_files/2020/04022020.htm)
Chet...
These are very unusual times and it might be best to get away from the madness and concentrate on something you can do something about. If you are practicing social distancing at home.., it might be a good time to start that project you have been putting on the sidelines. Its hard to turn away from the news.., like a train wreck you just can't look away.., but accomplishing something might be better for your mental health.
Mechanical work done on to the Interior:
Click the link below for the blow by blow.
http://www.1948plymouth.info/1929/Work_files/2020/04022020.htm (http://www.1948plymouth.info/1929/Work_files/2020/04022020.htm)
Chet...
Title: Re: 29 Build Thread - Part 3
Post by: Articifer Tom on April 04, 2020, 10:04:50 PM
Post by: Articifer Tom on April 04, 2020, 10:04:50 PM
Staying safe here in Pa. Trees starting to bud . Mower on this week .
Using your plans Chet , Made front engine pan , working on hood bumpers and tail pipe clamp and pipe itself . Changes manifold gaskets and fixing other leaks . Here pic of pan and bumper ,along with die for back bend to strengthen .

Using your plans Chet , Made front engine pan , working on hood bumpers and tail pipe clamp and pipe itself . Changes manifold gaskets and fixing other leaks . Here pic of pan and bumper ,along with die for back bend to strengthen .
Title: Re: 29 Build Thread - Part 3
Post by: chetbrz on April 04, 2020, 10:58:50 PM
Post by: chetbrz on April 04, 2020, 10:58:50 PM
Tom, Excellent job. Looks like a NOS part !! I hope it works, it looks great.
PS... How did you bend the flange part. It looks perfect.
PS... How did you bend the flange part. It looks perfect.
Title: Re: 29 Build Thread - Part 3
Post by: Marc28plym on April 06, 2020, 12:28:16 PM
Post by: Marc28plym on April 06, 2020, 12:28:16 PM
Looking great! Nice job sir.
Title: Re: 29 Build Thread - Part 3
Post by: Articifer Tom on April 06, 2020, 02:12:47 PM
Post by: Articifer Tom on April 06, 2020, 02:12:47 PM
Thanks , used a break to make the 90's . On the pan , I actually started wrong , figured I could bend from one side thru other .
The 5/8 lip around oil pan profile cannot be done unless stamped so did the straight only . Then allowed extra 1/4" in curves , and hammered them over 4-1/2 pipe . This moved weld of curved pieces to above radius and less noticeable . Nephew welded . Wife does not want me in ER again with oxygen catching fire . It is hard on facial hair and nasal passages . I also over made lip height and trimmed to size latter . Bending the lip area should , maybe done first . I was able to use a metal shop break with removable sections . Otherwise ,would have had to hammer in .
The 5/8 lip around oil pan profile cannot be done unless stamped so did the straight only . Then allowed extra 1/4" in curves , and hammered them over 4-1/2 pipe . This moved weld of curved pieces to above radius and less noticeable . Nephew welded . Wife does not want me in ER again with oxygen catching fire . It is hard on facial hair and nasal passages . I also over made lip height and trimmed to size latter . Bending the lip area should , maybe done first . I was able to use a metal shop break with removable sections . Otherwise ,would have had to hammer in .
Title: Re: 29 Build Thread - Part 3
Post by: chetbrz on April 06, 2020, 03:45:40 PM
Post by: chetbrz on April 06, 2020, 03:45:40 PM
Very cleaver Tom. The welding looks good also. I didn't notice that until you pointed it out.
Nice job.
Nice job.
Title: Re: 29 Build Thread - Part 3
Post by: frankp on April 12, 2020, 04:49:02 PM
Post by: frankp on April 12, 2020, 04:49:02 PM
Well done Chet and Tom!
Title: Re: 29 Build Thread - Part 3
Post by: chetbrz on April 14, 2020, 04:18:38 PM
Post by: chetbrz on April 14, 2020, 04:18:38 PM
Glass & Interior Continued.
Just chipping away. Staying busy is a good thing these days.
Click the link below for the blow by blow.
http://www.1948plymouth.info/1929/Work_files/2020/04142020.htm (http://www.1948plymouth.info/1929/Work_files/2020/04142020.htm)
Chet...
Just chipping away. Staying busy is a good thing these days.
Click the link below for the blow by blow.
http://www.1948plymouth.info/1929/Work_files/2020/04142020.htm (http://www.1948plymouth.info/1929/Work_files/2020/04142020.htm)
Chet...
Title: Re: 29 Build Thread - Part 3
Post by: frankp on April 15, 2020, 05:28:47 PM
Post by: frankp on April 15, 2020, 05:28:47 PM
As usual. Nice work! frank
Title: Re: 29 Build Thread - Part 3
Post by: chetbrz on April 26, 2020, 05:07:13 PM
Post by: chetbrz on April 26, 2020, 05:07:13 PM
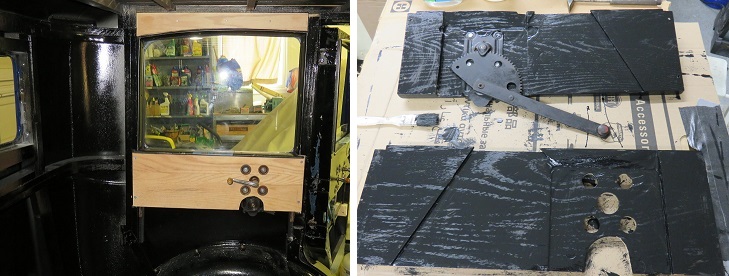
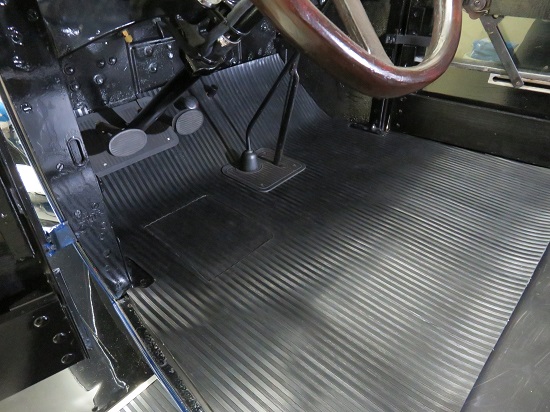
Interior Front Floor.
Still chipping away while ordering and waiting for interior materials.
Click the link below for the blow by blow.
http://www.1948plymouth.info/1929/Work_files/2020/04262020.htm (http://www.1948plymouth.info/1929/Work_files/2020/04262020.htm)
Chet...
Still chipping away while ordering and waiting for interior materials.
Click the link below for the blow by blow.
http://www.1948plymouth.info/1929/Work_files/2020/04262020.htm (http://www.1948plymouth.info/1929/Work_files/2020/04262020.htm)
Chet...
Title: Re: 29 Build Thread - Part 3
Post by: Russ T. Fender on April 26, 2020, 05:42:58 PM
Post by: Russ T. Fender on April 26, 2020, 05:42:58 PM
Who is doing the door handles and window regulator handles for you? Mine are crumbling and I believe yours are the same as the ones for the 30-U.
Title: Re: 29 Build Thread - Part 3
Post by: chetbrz on April 26, 2020, 06:32:01 PM
Post by: chetbrz on April 26, 2020, 06:32:01 PM
Quote from: Russ T. Fender on April 26, 2020, 05:42:58 PM
Who is doing the door handles and window regulator handles for you? Mine are crumbling and I believe yours are the same as the ones for the 30-U.
Mike Butters. I ordered the complete set almost 3 years ago. They are shipping out on Monday. I'll let you know how they look once I have them in hand.
Title: Re: 29 Build Thread - Part 3
Post by: Russ T. Fender on April 26, 2020, 06:48:16 PM
Post by: Russ T. Fender on April 26, 2020, 06:48:16 PM
Thanks, the pictures of what you ordered look fantastic.
Title: Re: 29 Build Thread - Part 3
Post by: chetbrz on April 26, 2020, 07:31:30 PM
Post by: chetbrz on April 26, 2020, 07:31:30 PM
Quote from: Russ T. Fender on April 26, 2020, 06:48:16 PM
Thanks, the pictures of what you ordered look fantastic.
I hope so. He made a lot of these for a couple forum members. I wasn't in any rush but I will be needing them very soon.
Title: Re: 29 Build Thread - Part 3
Post by: frankp on April 28, 2020, 12:51:07 PM
Post by: frankp on April 28, 2020, 12:51:07 PM
Russ, the 30U handles are not made of pot metal. They have the same pattern and a little smaller in dimension. Correct escutcheons for a 30U will not fit 28/29 handles. The opening is too small. This picture not the best, but it does show the size difference of the rear window crank of sedan. The broken one was in my car.
Chet, I apologize for butting in your thread. frank
Chet, I apologize for butting in your thread. frank
Title: Re: 29 Build Thread - Part 3
Post by: chetbrz on April 28, 2020, 01:35:49 PM
Post by: chetbrz on April 28, 2020, 01:35:49 PM
I just hope the handles he made work for my car. I think John F did all the research.
Chet...
Title: Re: 29 Build Thread - Part 3
Post by: frankp on April 28, 2020, 01:54:55 PM
Post by: frankp on April 28, 2020, 01:54:55 PM
I'm sure the handles will fit.
Title: Re: 29 Build Thread - Part 3
Post by: Russ T. Fender on April 28, 2020, 05:50:32 PM
Post by: Russ T. Fender on April 28, 2020, 05:50:32 PM
Frank, my car is a very early 30-U and the two original handles that were left when I got the car from the original owner were pot metal so I am hoping that the '29 handles will be right for my car. In any event, if they reproduce the escutcheon plates too I assume it won't be a problem. I suspect that Walter P. did the same thing Henry Ford did which was to use up existing parts in the next model year until exhausted if possible.
Title: Re: 29 Build Thread - Part 3
Post by: frankp on April 28, 2020, 11:55:16 PM
Post by: frankp on April 28, 2020, 11:55:16 PM
Russ, Of course. Didn't mean to give you a bum steer. frank
Title: Re: 29 Build Thread - Part 3
Post by: chetbrz on May 10, 2020, 02:25:22 PM
Post by: chetbrz on May 10, 2020, 02:25:22 PM
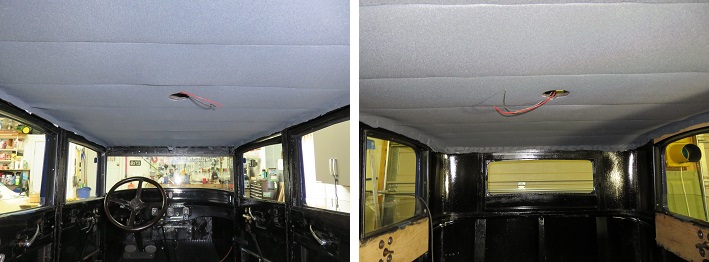
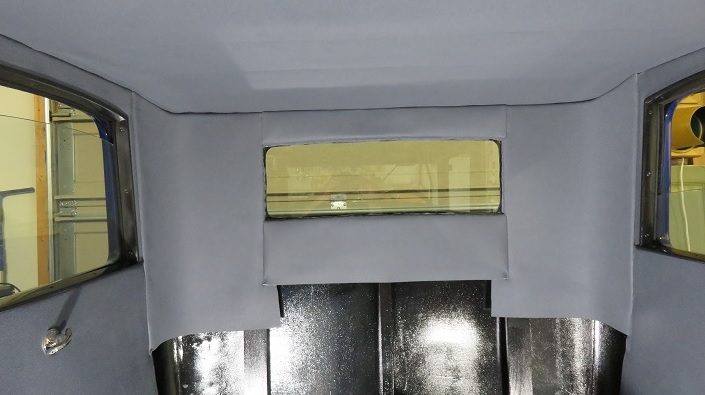
Interior Headliner.
This took some time but came out really nice.
Click the link below for the blow by blow.
http://www.1948plymouth.info/1929/Work_files/2020/05102020.htm (http://www.1948plymouth.info/1929/Work_files/2020/05102020.htm)
Chet...
This took some time but came out really nice.
Click the link below for the blow by blow.
http://www.1948plymouth.info/1929/Work_files/2020/05102020.htm (http://www.1948plymouth.info/1929/Work_files/2020/05102020.htm)
Chet...
Title: Re: 29 Build Thread - Part 3
Post by: frankp on May 11, 2020, 04:09:45 PM
Post by: frankp on May 11, 2020, 04:09:45 PM
Very Nice!! I'd say.
Title: Re: 29 Build Thread - Part 3
Post by: racertb on May 11, 2020, 04:33:42 PM
Post by: racertb on May 11, 2020, 04:33:42 PM
Yes nice!
Title: Re: 29 Build Thread - Part 3
Post by: chetbrz on May 20, 2020, 03:48:59 PM
Post by: chetbrz on May 20, 2020, 03:48:59 PM
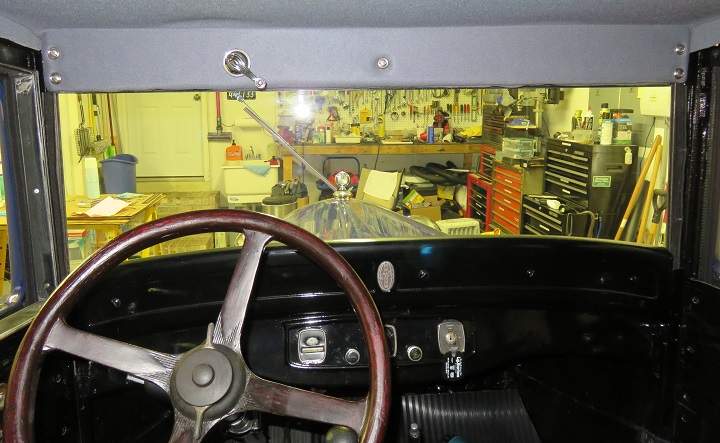
Headliner/Windshield Riser.
Learning While Doing.
Click the link below for the blow by blow.
http://www.1948plymouth.info/1929/Work_files/2020/05202020.htm (http://www.1948plymouth.info/1929/Work_files/2020/05202020.htm)
Chet...
Learning While Doing.
Click the link below for the blow by blow.
http://www.1948plymouth.info/1929/Work_files/2020/05202020.htm (http://www.1948plymouth.info/1929/Work_files/2020/05202020.htm)
Chet...
Title: Re: 29 Build Thread - Part 3
Post by: frankp on May 22, 2020, 04:34:51 PM
Post by: frankp on May 22, 2020, 04:34:51 PM
Well done Chet!
Title: Re: 29 Build Thread - Part 3
Post by: chetbrz on June 10, 2020, 07:45:24 PM
Post by: chetbrz on June 10, 2020, 07:45:24 PM
Interior / Rear Passenger Area .
Chipping away at the interior.
Click the link below for the blow by blow.
http://www.1948plymouth.info/1929/Work_files/2020/06102020.htm (http://www.1948plymouth.info/1929/Work_files/2020/06102020.htm)
Chet...
Chipping away at the interior.
Click the link below for the blow by blow.
http://www.1948plymouth.info/1929/Work_files/2020/06102020.htm (http://www.1948plymouth.info/1929/Work_files/2020/06102020.htm)
Chet...
Title: Re: 29 Build Thread - Part 3
Post by: racertb on June 11, 2020, 11:11:35 AM
Post by: racertb on June 11, 2020, 11:11:35 AM
I like it! Really coming along :)
Ted
Ted
Title: Re: 29 Build Thread - Part 3
Post by: frankp on June 11, 2020, 12:03:28 PM
Post by: frankp on June 11, 2020, 12:03:28 PM
Great work Chet! You'll have it done in no time.
Title: Re: 29 Build Thread - Part 3
Post by: chetbrz on June 11, 2020, 01:08:02 PM
Post by: chetbrz on June 11, 2020, 01:08:02 PM
Thanks for the At-a-Boy. It helps keep me going. This interior stuff is very time consuming. I can't imagine what someone would charge for this type work. I spoke to a shop near me and they won't give a price but charges $125 / hour. My first question was how fast do you work and do you charge for thinking about it. The guy didn't find my comment amusing and said he had a one year backlog.
Title: Re: 29 Build Thread - Part 3
Post by: Marc28plym on June 13, 2020, 08:39:43 AM
Post by: Marc28plym on June 13, 2020, 08:39:43 AM
Looking great! Very nice job. Thanks for sharing.
Title: Re: 29 Build Thread - Part 3
Post by: chetbrz on June 25, 2020, 12:28:31 PM
Post by: chetbrz on June 25, 2020, 12:28:31 PM
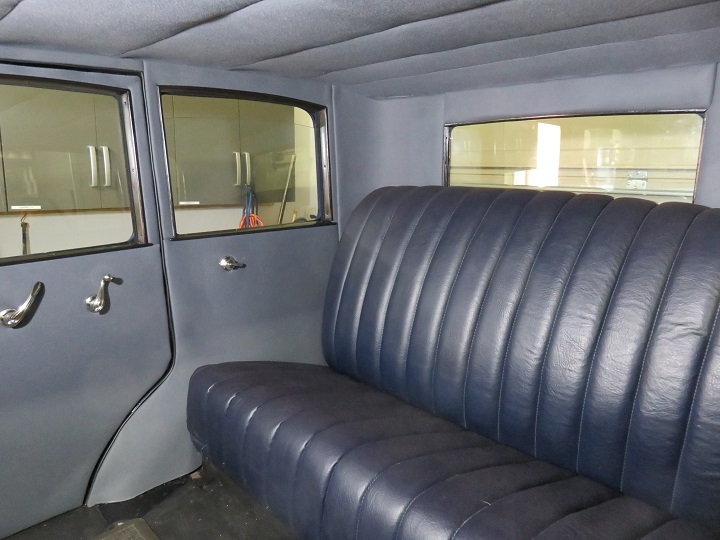
Interior / Rear Passenger Seat Area .
Chipping away at the interior.
Click the link below for the blow by blow.
Link: Interior - Rear Seat Area (http://www.1948plymouth.info/1929/Work_files/2020/06252020.htm)
Chet...
Chipping away at the interior.
Click the link below for the blow by blow.
Link: Interior - Rear Seat Area (http://www.1948plymouth.info/1929/Work_files/2020/06252020.htm)
Chet...
Title: Re: 29 Build Thread - Part 3
Post by: frankp on June 25, 2020, 07:21:28 PM
Post by: frankp on June 25, 2020, 07:21:28 PM
Chet, looking great! Like the way you solved rear window install.
Title: Re: 29 Build Thread - Part 3
Post by: chetbrz on June 26, 2020, 10:31:18 AM
Post by: chetbrz on June 26, 2020, 10:31:18 AM
Thanks Frank,
Picture of the installed window frame.
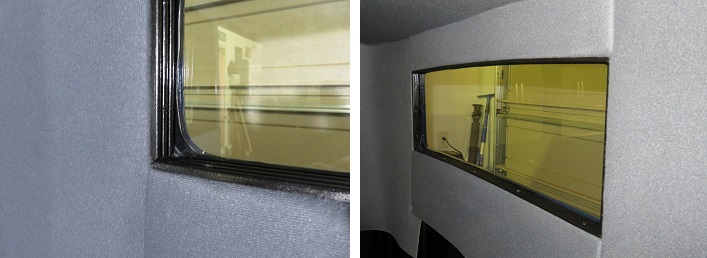
Picture of the installed window frame.
Title: Re: 29 Build Thread - Part 3
Post by: ski on June 26, 2020, 11:29:04 AM
Post by: ski on June 26, 2020, 11:29:04 AM
Looks great. Real nice work Chet.
Title: Re: 29 Build Thread - Part 3
Post by: racertb on June 26, 2020, 12:44:40 PM
Post by: racertb on June 26, 2020, 12:44:40 PM
Yes, looking good!
Title: Re: 29 Build Thread - Part 3
Post by: chetbrz on June 26, 2020, 05:01:04 PM
Post by: chetbrz on June 26, 2020, 05:01:04 PM
Many Thanks,
I hope you guys are staying safe. Chet...
I hope you guys are staying safe. Chet...
Title: Re: 29 Build Thread - Part 3
Post by: chetbrz on July 10, 2020, 05:54:46 PM
Post by: chetbrz on July 10, 2020, 05:54:46 PM
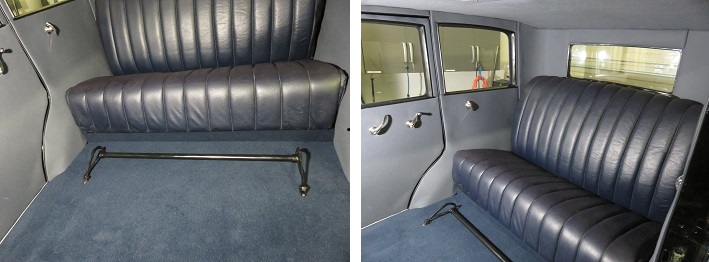
Interior / Rear Passenger Seat Repair .
Very long report with many pictures.
Click the link below for the blow by blow.
Link: Interior - Rear Seat Repair (http://www.1948plymouth.info/1929/Work_files/2020/07102020.htm)
Chet...
Very long report with many pictures.
Click the link below for the blow by blow.
Link: Interior - Rear Seat Repair (http://www.1948plymouth.info/1929/Work_files/2020/07102020.htm)
Chet...
Title: Re: 29 Build Thread - Part 3
Post by: Articifer Tom on July 10, 2020, 06:51:02 PM
Post by: Articifer Tom on July 10, 2020, 06:51:02 PM
Looking good ,Chet. And what do you care if the back seat is comfortable . Your back seat time ended years ago LOL!
Title: Re: 29 Build Thread - Part 3
Post by: chetbrz on July 10, 2020, 07:14:38 PM
Post by: chetbrz on July 10, 2020, 07:14:38 PM
Quote from: Articifer Tom on July 10, 2020, 06:51:02 PM
Looking good ,Chet. And what do you care if the back seat is comfortable . Your back seat time ended years ago LOL!
One can always hope!
Title: Re: 29 Build Thread - Part 3
Post by: racertb on July 11, 2020, 03:47:20 PM
Post by: racertb on July 11, 2020, 03:47:20 PM
Very nice!
Title: Re: 29 Build Thread - Part 3
Post by: frankp on July 14, 2020, 10:31:47 PM
Post by: frankp on July 14, 2020, 10:31:47 PM
Looks great!
Title: Re: 29 Build Thread - Part 3
Post by: chetbrz on July 28, 2020, 12:27:41 PM
Post by: chetbrz on July 28, 2020, 12:27:41 PM
Interior / Backseat Area Odds & Ends.
Another benchmark completed, almost finished !!
Click the link below for the blow by blow.
Link: Interior - Backseat Area Odds & Ends (http://www.1948plymouth.info/1929/Work_files/2020/07282020.htm)
Chet...
Another benchmark completed, almost finished !!
Click the link below for the blow by blow.
Link: Interior - Backseat Area Odds & Ends (http://www.1948plymouth.info/1929/Work_files/2020/07282020.htm)
Chet...
Title: Re: 29 Build Thread - Part 3
Post by: frankp on July 30, 2020, 12:57:44 AM
Post by: frankp on July 30, 2020, 12:57:44 AM
Won't be long now!
Title: Re: 29 Build Thread - Part 3
Post by: chetbrz on July 30, 2020, 10:30:50 AM
Post by: chetbrz on July 30, 2020, 10:30:50 AM
Hi Frank, I think the saying "all dressed up and no place to go". I don't think there is a single car show scheduled for 2020 in Delaware. Not that it matters but it would be nice to take a drive in the fall. Everything depends on how the roof goes.
BTW. This site has been so quiet I guess it's a sign of the times. Bigger fish to fry these days.
Chet
BTW. This site has been so quiet I guess it's a sign of the times. Bigger fish to fry these days.
Chet
Title: Re: 29 Build Thread - Part 3
Post by: racertb on July 31, 2020, 04:27:36 PM
Post by: racertb on July 31, 2020, 04:27:36 PM
Looks awesome Chet! When is the anticipated completion date?
Title: Re: 29 Build Thread - Part 3
Post by: chetbrz on July 31, 2020, 05:13:45 PM
Post by: chetbrz on July 31, 2020, 05:13:45 PM
Quote from: racertb on July 31, 2020, 04:27:36 PM
Looks awesome Chet! When is the anticipated completion date?
Ted, I don't think you ever finish you just switch from restoration to maintenance mode. I hope to be back on the road and through the state inspection by the fall.
Title: Re: 29 Build Thread - Part 3
Post by: chetbrz on August 23, 2020, 07:23:51 PM
Post by: chetbrz on August 23, 2020, 07:23:51 PM
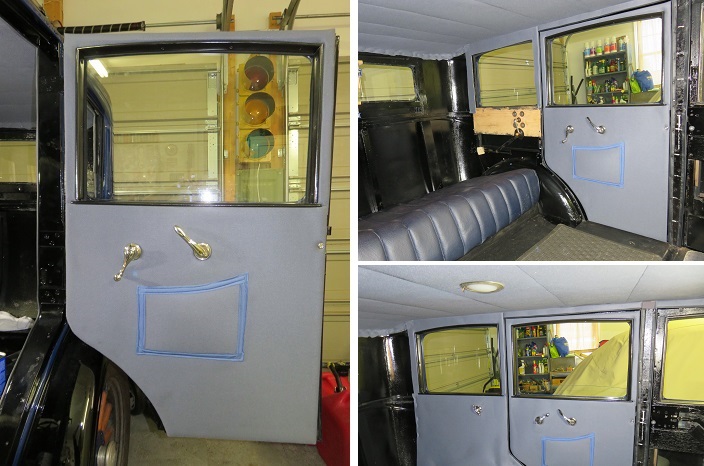
Interior / Front Seat & Doors.
We are one project away from completion. Ya !! :)
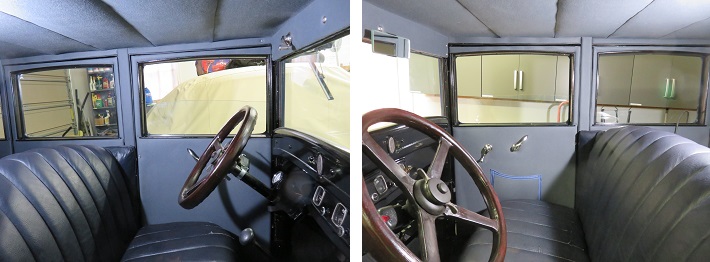
Click the link below for the blow by blow.
Link: Interior - Front Seat and Doors (http://www.1948plymouth.info/1929/Work_files/2020/08232020.htm)
Chet...
We are one project away from completion. Ya !! :)
Click the link below for the blow by blow.
Link: Interior - Front Seat and Doors (http://www.1948plymouth.info/1929/Work_files/2020/08232020.htm)
Chet...
Title: Re: 29 Build Thread - Part 3
Post by: Articifer Tom on August 23, 2020, 08:49:01 PM
Post by: Articifer Tom on August 23, 2020, 08:49:01 PM
Looks Great !!!
Title: Re: 29 Build Thread - Part 3
Post by: frankp on August 27, 2020, 01:01:22 PM
Post by: frankp on August 27, 2020, 01:01:22 PM
Chet, You and your wife doing great work! Now for the hat.
Title: Re: 29 Build Thread - Part 3
Post by: Marc28plym on September 06, 2020, 06:13:50 AM
Post by: Marc28plym on September 06, 2020, 06:13:50 AM
WOW, looking great! Congratulations sir. I love it.
Title: Re: 29 Build Thread - Part 3
Post by: 29UJohn on October 03, 2020, 06:51:04 PM
Post by: 29UJohn on October 03, 2020, 06:51:04 PM
Looking great! I like your idea of using escrow on the side panels above the front seat back.
Title: Re: 29 Build Thread - Part 3
Post by: chetbrz on October 03, 2020, 07:23:28 PM
Post by: chetbrz on October 03, 2020, 07:23:28 PM
Hi John,
It's been awhile I hope everything by you is good. Working on the final project the roof.
If I would have thought of it earlier I might have used Velcro on all the door panels. I guess hindsight is always 20/20.
It's been awhile I hope everything by you is good. Working on the final project the roof.
If I would have thought of it earlier I might have used Velcro on all the door panels. I guess hindsight is always 20/20.
Title: Re: 29 Build Thread - Part 3
Post by: racertb on October 06, 2020, 08:27:46 AM
Post by: racertb on October 06, 2020, 08:27:46 AM
You do great work Chet!
Title: Re: 29 Build Thread - Part 3
Post by: chetbrz on October 06, 2020, 11:21:48 AM
Post by: chetbrz on October 06, 2020, 11:21:48 AM
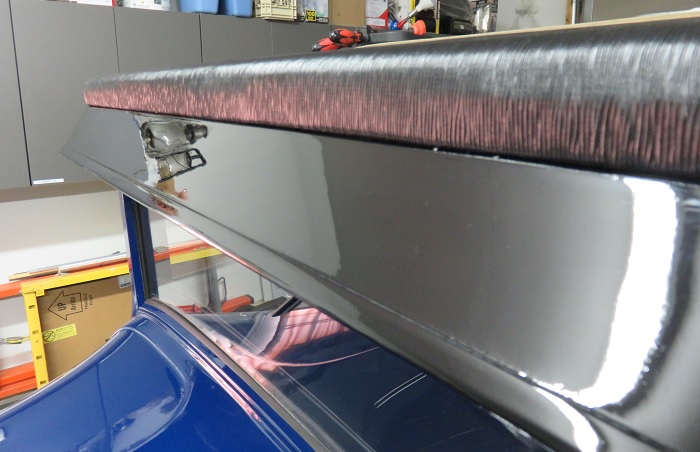
The Final Project - The Roof.
This report was getting quite long so I decided to post even though I'm not finished yet.
I have been working on other things so even though this is tedious work it hasn't possessed all my time.
I have spent more time researching the task than actually doing it.
Click the link below for the blow by blow.
Link: Exterior - The Roof part 1 (http://www.1948plymouth.info/1929/Work_files/2020/10062020.htm)
Chet...
PS... Thanks for all the kind words. :)
Title: Re: 29 Build Thread - Part 3
Post by: Articifer Tom on October 06, 2020, 03:48:32 PM
Post by: Articifer Tom on October 06, 2020, 03:48:32 PM
Looks great Chet . Hope we see more pics of back and channel interface . Smart to start hard end and stretch forward .
Title: Re: 29 Build Thread - Part 3
Post by: chetbrz on October 11, 2020, 05:00:57 PM
Post by: chetbrz on October 11, 2020, 05:00:57 PM
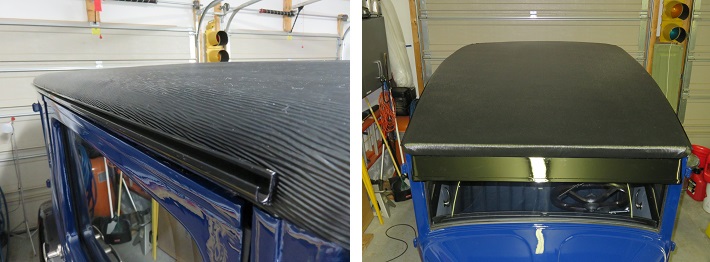
The Final Project - The Roof Part II
I guess I'm Finished !! There are always some little things to do but for the most part I think I'm done. Time to switch to maintenance mode. 8)
Click the link below for the blow by blow.
Link: Exterior - The Roof part II (http://www.1948plymouth.info/1929/Work_files/2020/10112020.htm)
Chet...
PS... Thanks for all the support over the past 4 years. :)
Title: Re: 29 Build Thread - Part 3
Post by: racertb on October 11, 2020, 09:00:02 PM
Post by: racertb on October 11, 2020, 09:00:02 PM
🎂🎉🇺🇸🎁🌞🎉
Title: Re: 29 Build Thread - Part 3
Post by: 29UJohn on October 16, 2020, 02:54:00 PM
Post by: 29UJohn on October 16, 2020, 02:54:00 PM
Congratulations!
Title: Re: 29 Build Thread - Part 3
Post by: chetbrz on October 16, 2020, 07:39:26 PM
Post by: chetbrz on October 16, 2020, 07:39:26 PM
My thanks to everyone's comments and suggestions which helped shape the final outcome of my project. Now I just need to get to the DMV for a one time inspection to get recertified to drive on state roads. I don't foresee any issues.
Chet...
Chet...
Title: Re: 29 Build Thread - Part 3
Post by: ski on October 18, 2020, 08:37:59 PM
Post by: ski on October 18, 2020, 08:37:59 PM
Amazing job Chet. I learned a lot following along with your build. Here's to many happy miles ahead!