• Welcome to 28Q29U Plymouth Forum.
 

News:

NEW FORUM version is here. 
If you are experiencing any problems, contact chetbrz@aol.com
WELCOME Auto Registration is turned OFF. 
In order to register for this forum please contact chetbrz@aol.com to request access.

Main Menu
Menu

Show posts

This section allows you to view all posts made by this member. Note that you can only see posts made in areas you currently have access to.

Show posts Menu

Messages - racertb

#601
General Discussion / Re: Gentlemen, I've got a problem
January 11, 2012, 04:50:36 PM
Never took out the drive shaft, only worked on the rear discs.  I could never get the new ones to compress enough...did not try two, but it looked like too much space when I put two up there.  I had to replace one of the bolts (one got stripped) , the rest were the original.   I could get longer bolts, but I guess I would need to drill holes for cotter pins.  I looked for longer bolts before with pre-drilled holes, but couldn't find them.

I know this is hard when you can't see it in person...I appreciate the help though!

Ted
#602
General Discussion / Re: Gentlemen, I've got a problem
January 10, 2012, 09:16:20 AM
Thanks Wayne...I did put the discs back together exactly the same way - it was easy to see how they fit back together the way they were "molded" and slightly curved in places.  It was almost like putting a puzzle together; I also put the washers in between the layers as well.

When I reinstalled, I thought I was pretty careful about tightening the bolts in sequence (like a tire, like you mentioned in an earlier post).  What you said above makes sense and I'm sure the problem is in this area (tailshaft) of the car since this is the only thing I worked on under the car (other than the emergency brake).

I doubt I bent the drive shaft in any way, so the discs/tailshaft has got to be the issue like you said.  I don't plan on driving the car until I get this fixed.

Any ideas at this point?
#603
General Discussion / Gentlemen, I've got a problem
January 09, 2012, 09:21:16 PM
As many of you know, I recently did some work to my '29 roadster (new blackwall tires, etc.) to get it ready to show last Thanksgiving in Ormond Beach; I even posted several photos from the show.  I had the car trailored down, so it was not driven much.  Even from the hotel to the show, it was only a couple of miles and the issue not really noticeable.  Well, here is the issue.  If you remember, I got new u-joint discs that I was going to install.  I attempted to install them at the time, but couldn't get them to compress for the life of me (I only worked with the REAR discs and never touched the front).  I ended up putting the old (rear) discs back on.  I also adjusted the emergency brake at the time as well...

Here is the problem:

1. I have a bad drivetrain vibration that was never there before I "messed" with the discs.  I occurs around 20-25mph and gets worse the faster I go.

2. There is a "ticking" sound that comes from the transmission that is most evident when I engage the clutch while the car is in gear; it goes away when I shift into neutral

I think I may have done something wrong when putting the original discs back on and after adjusting the e-brake.  Something is just not right.

Again, this never was a problem before I tried to replace the rear discs and adjust the e-brake...help!


#604
General Discussion / Re: Fabric/rubberized U-Joint Discs
November 29, 2011, 11:45:20 AM
With the buckle washers installed with the older discs, it took forever to get them back in.  I would have to use longer bolts to fit the new ones in.
#605
General Discussion / Re: Fabric/rubberized U-Joint Discs
November 22, 2011, 06:43:50 PM
Finally got the last one done.  The castle nut stripped and started spinning in place, but found one at Home Depot that fit perfectly and got the cotter pin in.  This was more of a pain than working with the demountable rims!
#606
General Discussion / Re: Fabric/rubberized U-Joint Discs
November 21, 2011, 12:45:27 PM
Well, after three days of struggling, I had to go back to the old discs.  Even now, I can only get 2 of the three bolts to go through all the way to get the cotter pins in.  The third is almost there, but can't quite get compressed enough to see the hole for the cotter pin.  I save the new discs for another time as the show is this weekend and I don't have the time, a lift or other tools to wrestle with this.  Will try one more time today, otherwise it is what it is.  The old discs weren't terrible, but I thought I'd replace while I was doing other things to the car.

Oh well...car looks great and will post photos sometime after the weekend.
#607
General Discussion / Re: Fabric/rubberized U-Joint Discs
November 15, 2011, 12:23:28 PM
Wayne/John:

I will go with the larger bolts for now to see about compressing...hopefully, I'll get them compressed enough quickly to put the original bolts and castle nuts back on...will do diagonally and still have the original buckle washers.

Trying to finalize the car for a show Thanksgiving weekend...got the tires and wheels all done, rebuilt a wheel cylinder in the process, and going to put the newly chromed bumpers back on this weekend.  Hopefully a test drive this weekend as well...

Thanks for your help!
#608
General Discussion / Re: Fabric/rubberized U-Joint Discs
November 14, 2011, 12:20:22 PM
Five total discs...three go in the rear (that's what was there) and two in the front. 
#609
General Discussion / Re: Fabric/rubberized U-Joint Discs
November 13, 2011, 05:56:33 PM
I got the discs from Gene yesterday and I was in the middle of installing the rear three today.  The problem is, the bolts that have the castle nuts (w/cotter pins) now don't go all the way through!  I guess the discs are a little think or not just worn in...it looks like I'm going to have to get some hex bolts about a 1/2" longer so I'll be able to get a lock washer and nut on the end.

Any other suggestions?
#610
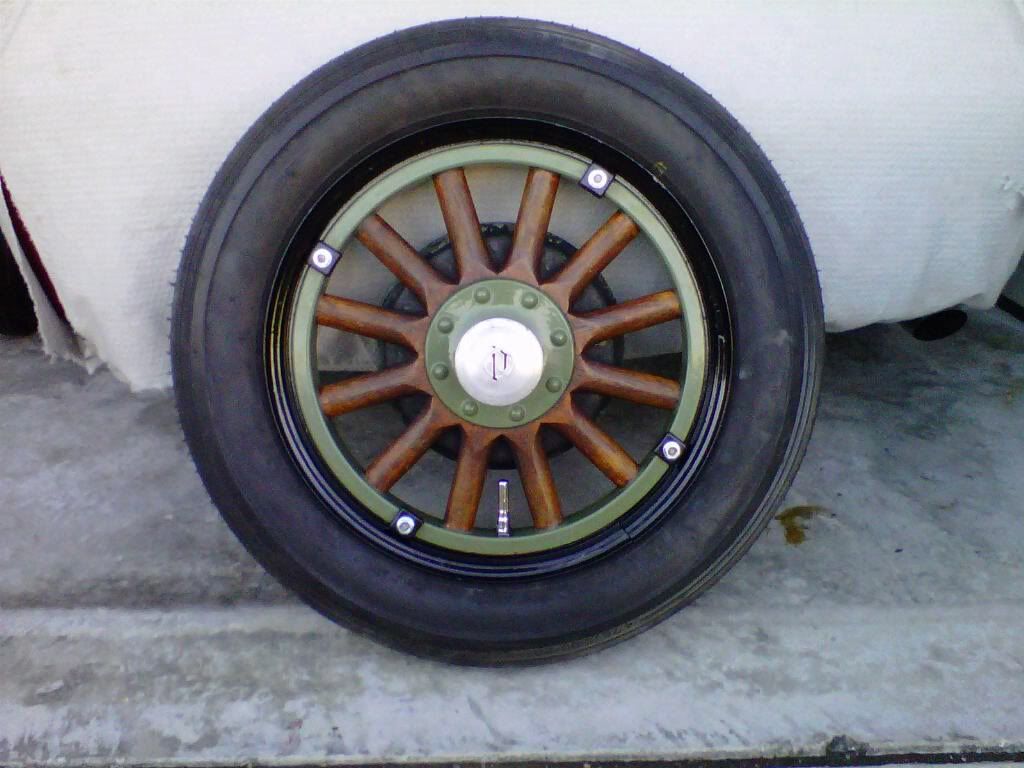
Well, here is an example of the finished product with new tire and black rim; felloe color and spokes remain the same.  Just need to clean up the tire(s)and detail a little and will be able to put back on the car.  Found some matching paint at Home Depot that I can use to touch up the felloes...all the wheels and tires look good sitting next to each other in the garage.  Working on installing the bumpers now since I had them re-chromed as well.


#611
I meant to say '28 Plymouth for the Chrysler museum photo...
#612
John:

That's what I thought all along and why I was asking the question.  However, if the reducer nut is done that way, it's almost impossible (or entirely impossible) to get the felloe on since the stem would be too stiff in place.  To put the reducer nut on after and through the hole in the felloe is impossible as well; it won't go through the hole in the felloe.

Also, the pictures I've seen using these stems and dust covers shows the stem sticking high through the felloe with the dust cover.  If done this way you and I think it should be, them stem wouldn't stick out too much through the felloe.  I guess to confirm that both the reducer nut and dust cover both go on last and after the felloe, there is a photo of a 1929 Chrysler Model 75 in the September/October 2011 issue of the AACA magazine.  If one looks close enough, they can see the reducer nut and dust cover "on top" of the felloe in one or two of the photos.  On the AACA forum site someone had posted some cars from the Chrysler museum ('29 Plymouth) that shows the same thing...I guess that is the correct way after all.

I posed the question to Earl and Jeff Buton and the answer I received (from Earl) was that they didn't know because they have wire wheels...
#613
Hi Wayne:

No rudeness taken...like in your photo, the rim I am referring to is the round piece of steel (black) with the tire mounted on it and I've got that part already to go.  The felloe is the other round piece with the wood spokes attached.  On our cars, this is steel as well (as you know) and the spokes are wood.

My question has to do with the placement of the rim washer/reducer in the first diagram (does this go on before the felloe is put on?  I don't see how it could, but I want to be sure).  Or, do I put the entire wheel together first - like in the photo -  and then the rim washer/reducer and dust cover.  This would definitely be the easier (and most likely correct) way to go, but the valve stem hole in the felloe is slightly larger than the rim washer/reducer.  I doesn't fall it, but it's just not a perfect fit.

I just want to get it right the first time since this project has been a pain in the ass :D
#614
Yes...that's what I've done...my question is about the rim washer and dust cover in the diagram.  The diagram makes it look like they goe on top of the rim.  The felloe is not shown in the diagram.  If I did the rim washer and dust cover at this stage, it would most likely be impossible to get the felloe on since the valve stem would be firmly in place.

I was told - and after looking at it some more in the garage - to put the felloe on first, and then screw down the rim washer over the stem until it contacts the felloe, then put on the dust cover.  This seems to make the most sense, however, the round hole in the felloe is slightly (very slightly) bigger in diameter than the rim washer (that's why I thought of putting some sort of flat washer between the rim washer and felloe).  I'm sure it will look fine once it's on there with the dust cover either way.

Does this make any sense?
#615
Thanks Tony, I'll try that.  The bolt is all the way in at the moment, but I'll see if I can make something work.