Title: 29 Sedan Roof comments welcomed
Post by: chetbrz on March 12, 2018, 02:20:16 PM
Post by: chetbrz on March 12, 2018, 02:20:16 PM
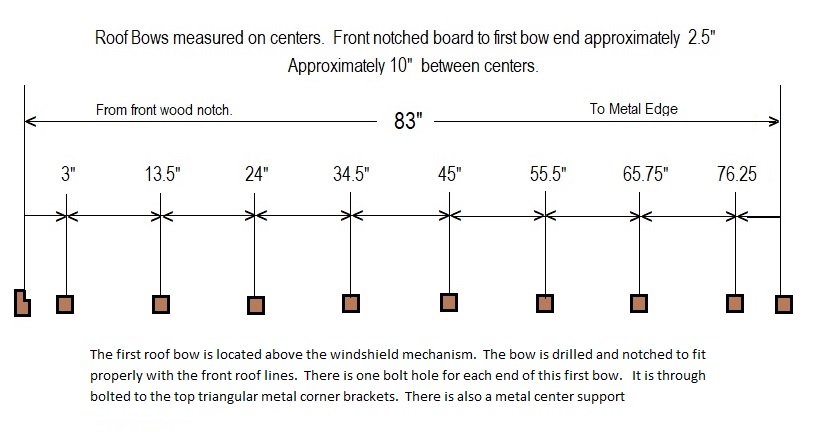
Dave sent me some excellent pictures of his original roof along with measurements. I created this diagram to be my work note reference for the positioning of the roof bows during the construction of the roof for my 29 sedan. If anyone has any additional info I would greatly appreciate it. I already have a template for the slight arc of the roof.
See diagram below and any comments welcomed.
Hopefully the weather warms up this week as we head toward the weekend.
Thanks, Chet...
See diagram below and any comments welcomed.
Hopefully the weather warms up this week as we head toward the weekend.
Thanks, Chet...
Title: Re: 29 Sedan Roof comments welcomed
Post by: chetbrz on March 13, 2018, 03:11:33 PM
Post by: chetbrz on March 13, 2018, 03:11:33 PM
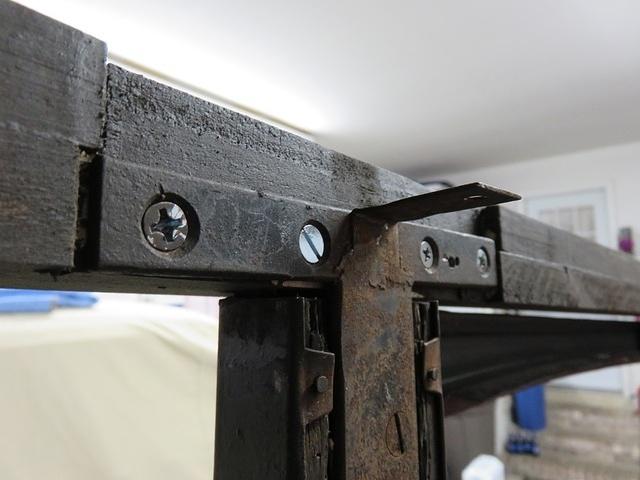
This afternoon while laying out the roof bows I realized that a bracket that is attached to the top of the center door post has nothing to attach to. I originally thought that this attached to a cross bow but neither Dave's pictures or another picture I have show a cross bow in this area?
The question is where does it attach to or is it something that was added to support the roof that a previous owner installed ?? Any comments. See pictures below:
The Top Center Door Pillar.
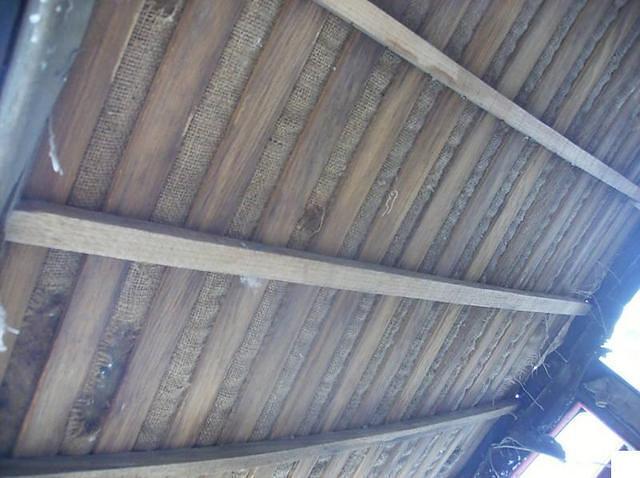
A picture of another 29 Sedan. No cross bow in the area of the center door post ??
This is not Dave's car but the bows alien with the measurements Dave sent me.
Anyone have any wisdom to add, Chet...
The question is where does it attach to or is it something that was added to support the roof that a previous owner installed ?? Any comments. See pictures below:
The Top Center Door Pillar.
A picture of another 29 Sedan. No cross bow in the area of the center door post ??
This is not Dave's car but the bows alien with the measurements Dave sent me.
Anyone have any wisdom to add, Chet...
Title: Re: 29 Sedan Roof comments welcomed
Post by: frankp on March 13, 2018, 06:12:58 PM
Post by: frankp on March 13, 2018, 06:12:58 PM
Chet,
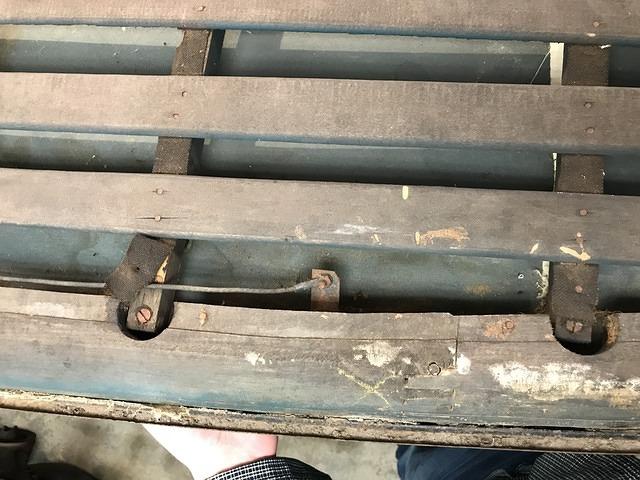
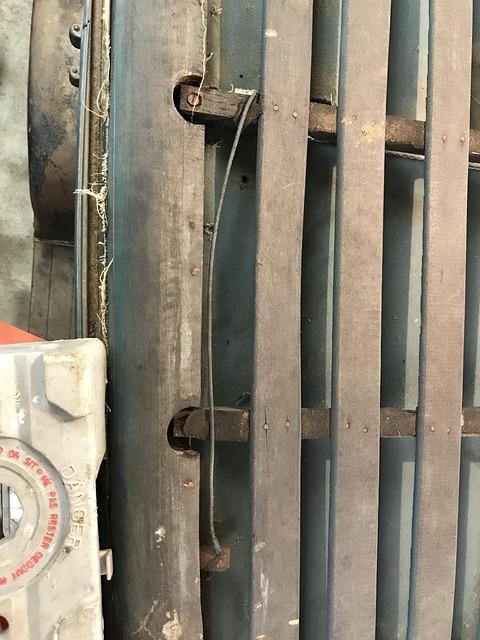
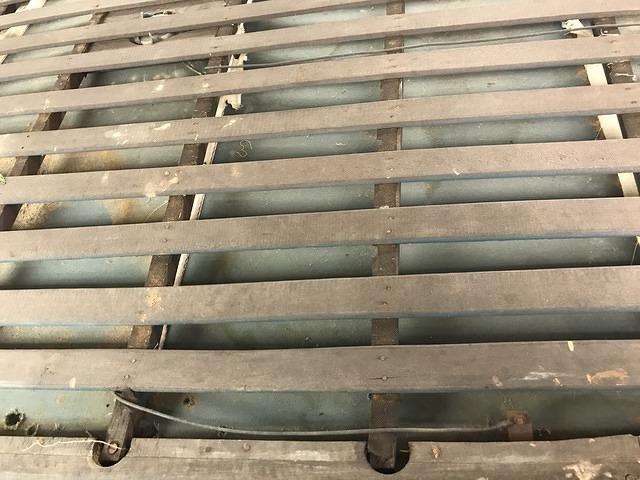
If memory serves, on the passenger side this hole bolted the ground wire from the dome lamp. The wire routed through holes in my bows. Does Dave's pictures show this? I would guess there is no right/left for that long piece of iron.
frank
If memory serves, on the passenger side this hole bolted the ground wire from the dome lamp. The wire routed through holes in my bows. Does Dave's pictures show this? I would guess there is no right/left for that long piece of iron.
frank
Title: Re: 29 Sedan Roof comments welcomed
Post by: Crazydave on March 13, 2018, 06:29:17 PM
Post by: Crazydave on March 13, 2018, 06:29:17 PM
Franks a winner!
Only purpose is to ground (positive) the light, but a picture is worth a thousands words they say. So I took some.
Only purpose is to ground (positive) the light, but a picture is worth a thousands words they say. So I took some.
Title: Re: 29 Sedan Roof comments welcomed
Post by: frankp on March 13, 2018, 06:53:26 PM
Post by: frankp on March 13, 2018, 06:53:26 PM
Memory come through again, amazing.
Chet, do you have a dome light and the mounting board? I may have some pieces. frank
Chet, do you have a dome light and the mounting board? I may have some pieces. frank
Title: Re: 29 Sedan Roof comments welcomed
Post by: chetbrz on March 13, 2018, 08:12:53 PM
Post by: chetbrz on March 13, 2018, 08:12:53 PM
You guys are Good !!!
This is the dome light that came with my car. Hopefully it is correct for the 29U
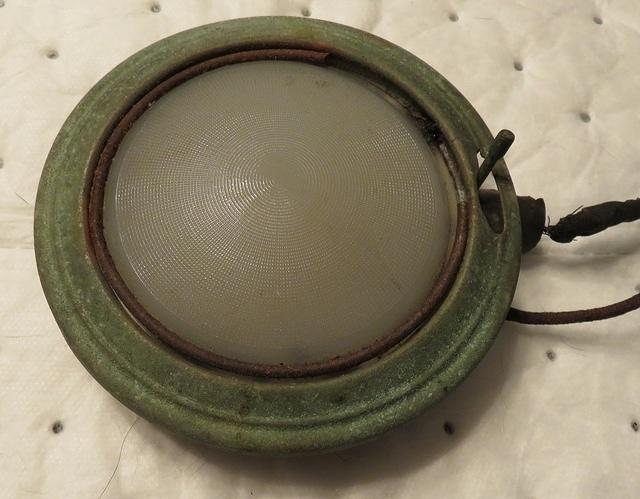
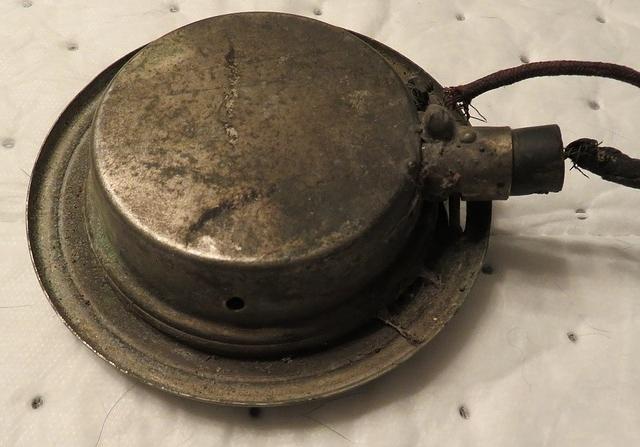
It's been sitting in an old tool box since I got the car. Yes there is a metal tab on each door column but the one on the passenger door is broken. I guess I will bend them back into the up direction. I thought they were for a cross member.
Very Cool...
Title: Re: 29 Sedan Roof comments welcomed
Post by: frankp on March 13, 2018, 11:19:12 PM
Post by: frankp on March 13, 2018, 11:19:12 PM
A little polish and your good, Chet - looks like the one in my car.
Title: Re: 29 Sedan Roof comments welcomed
Post by: Articifer Tom on March 14, 2018, 11:20:33 AM
Post by: Articifer Tom on March 14, 2018, 11:20:33 AM
Look'in good guys . Hay! Chet hope your gett'in rid of those Phillip Screws . Have some straights from my carriage building days if needed .
Title: Re: 29 Sedan Roof comments welcomed
Post by: chetbrz on March 14, 2018, 03:13:51 PM
Post by: chetbrz on March 14, 2018, 03:13:51 PM
Quote from: Articifer Tom on March 14, 2018, 11:20:33 AM
Look'in good guys . Hay! Chet hope your gett'in rid of those Phillip Screws . Have some straights from my carriage building days if needed .
Hi Tom,
Thanks for the offer. I purchased a lot of slotted wood and machine screws from https://www.boltdepot.com/ (https://www.boltdepot.com/) in the needed sizes. Yes I do have to go around and replace a couple of those Philips screws. They are actually a quarter inch to small. At the time I was short the proper screws. Now I just need to get around to some of the odds and ends. Those being one of them.
Boy nothing get past you guys, Chet... :)
Title: Re: 29 Sedan Roof comments welcomed
Post by: frankp on March 14, 2018, 06:05:17 PM
Post by: frankp on March 14, 2018, 06:05:17 PM
Chet, Your sedan won't run any better with the phillips buried under wood or upholstery. Now those slotted, nickel plated screws in the window mouldings, etc, will definitely make it run like a top. frank
Title: Re: 29 Sedan Roof comments welcomed
Post by: racertb on March 15, 2018, 02:36:08 PM
Post by: racertb on March 15, 2018, 02:36:08 PM
Yeah, the slotted screws are good for another 5HP.
Title: Re: 29 Sedan Roof comments welcomed
Post by: frankp on March 15, 2018, 05:13:04 PM
Post by: frankp on March 15, 2018, 05:13:04 PM
Here is part of the wood mount for the dome light. You get the idea Chet, mounts between bows.
(good one Ted)
(good one Ted)
Title: Re: 29 Sedan Roof comments welcomed
Post by: Articifer Tom on March 15, 2018, 05:48:27 PM
Post by: Articifer Tom on March 15, 2018, 05:48:27 PM
Just remember the slot must face in to the wind to get the 5 . ;D
Title: Re: 29 Sedan Roof comments welcomed
Post by: chetbrz on March 15, 2018, 07:34:11 PM
Post by: chetbrz on March 15, 2018, 07:34:11 PM
With all this extra horse power I might have to go with dual carburetors.
Frank thanks for the photo of the light board.
Frank thanks for the photo of the light board.
Title: Re: 29 Sedan Roof comments welcomed
Post by: frankp on March 16, 2018, 12:51:03 PM
Post by: frankp on March 16, 2018, 12:51:03 PM
Your welcome, Chet. Glad to help when I can. I think you would be better with a 2 barrel; syncing the linkage can be time consuming.
Artificer Tom, you're a good sport!
Artificer Tom, you're a good sport!
Title: Re: 29 Sedan Roof comments welcomed
Post by: moparfreak77 on September 03, 2018, 09:52:28 PM
Post by: moparfreak77 on September 03, 2018, 09:52:28 PM
Does the dome light come on with the doors open or only if you hit the switch?
Title: Re: 29 Sedan Roof comments welcomed
Post by: chetbrz on September 04, 2018, 10:27:06 AM
Post by: chetbrz on September 04, 2018, 10:27:06 AM
The stock wiring diagram doesn't show a door switch.
Title: Re: 29 Sedan Roof comments welcomed
Post by: Geoff57 on September 16, 2018, 07:19:18 PM
Post by: Geoff57 on September 16, 2018, 07:19:18 PM
CrazyDave,
Your information on how to do the roof is great. 'Chester Brzostowski' put me onto this topic. Best I could find was Roof Insert Kit 35-36 plymouth & Dodge 4 door sedan. at http://houseoftops.com/roof-inserts/ .
Could you please advise what/how do you progress after installing all the bows eg.
hessian
tar compound
how thick
tricks and hints
I have original left and right main front to back roof pine rafters with no obvious pre-attachments. There is also other differences in brackets and mounting on the Australian assembled 1929 Q's.
Regards
Geoff Davidson, Canberra Australia gsdavidson@grapevine.net.au
Title: Re: 29 Sedan Roof comments welcomed
Post by: Crazydave on September 17, 2018, 09:04:59 PM
Post by: Crazydave on September 17, 2018, 09:04:59 PM
Geoff57,
I have not repaired my roof yet, the work posted has all been Chet. I have just taken a few pictures and measurements.
See his details here > http://www.1948plymouth.info/1929/Work_files/2017/08312017.htm
Here > http://www.1948plymouth.info/1929/Work_files/2017/09132017.htm
and the main thread here > http://www.1948plymouth.info/28Q29U/index.php?topic=1102.90
If there is a specific original part that I can measure or take a picture of let me know.
Good luck!