• Welcome to 28Q29U Plymouth Forum.
 

News:

NEW FORUM version is here. 
If you are experiencing any problems, contact chetbrz@aol.com
WELCOME Auto Registration is turned OFF. 
In order to register for this forum please contact chetbrz@aol.com to request access.

Main Menu
Menu

Show posts

This section allows you to view all posts made by this member. Note that you can only see posts made in areas you currently have access to.

Show posts Menu

Messages - chetbrz

#736
Quote from: rwollman on August 08, 2018, 02:43:35 PM
Chet_ glad u got it worked out - I was thinking towards a binding or broken valve spring as based on your description of the noise in relation to cam revolution.....

Don't know for sure but we will see when I fire it up again.  Fingers crossed.
#737
Tom,

The Plymouth Instruction Book May, 1929 (page25) states:

Cold Setting for intake & exhaust is 0.008.  Hot setting is 0.006 for exhaust and 0.004 for intake.  The book states that these settings are necessary for quiet valve operation.  I set to 0.007 cold because the valves are stainless steel and may expand at a slightly greater rate than the original carbon steel.  Once the engine is broken in I will recheck and reset the gaps depending on noise level.  The builder set them at 0.010 - 0.012.., he wasn't aware of the 0.006 - 0.004 setting recommendation from the old text.

Maybe fire it up tomorrow, must cut grass again  :(
#738

I set all the valve gaps for 0.007 (go) &  0.008 (no go)

It appears like the metallic click is gone ?  See link below:

http://www.1948plymouth.info/1929/images/IMG_1254.MOV

I also removed the starter motor to check the rear of the flywheel for any signs of rubbing.  It checked out OK.

I guess I'll try running it again and see how it goes.  I'll keep you all posted...

#739
Good questions and suggestions,

Yes the engine ran fine prior to the rebuild except for a knock when driving above 35mph and using/leaking a quart of oil every 50 miles.   Also every now and again the engine would sputter.  A little miss or cough. Not really a problem and I believe it is caused by the home made distributor housing that is installed on my engine.   Functional but now exactly precision. 

Rich, I don't believe the housing is connected to the noise but I do have one on order from Then & Now Auto Parts.  Also I heard the clunk prior to installing my old housing.

I'm going to redo the valve adjustment today before it gets to hot outside.  Between the rain and heat it seems that I have to cut the grass every three days.  Just an extra added attraction to highlight the summer.

To add insult to injury my under ground electric line to my work shop shorted out.  So no power to the work shop.

I think I'll hold off buying any lottery tickets, doesn't seem to be the right time.
#740
Tom,

It's the clunk with each revolution of the cam shaft.  It happens twice per revolution of the crank.  Actually once with every movement of the third valve from the left in the video.  Vacuum jumps down from 21 to 19 on the vacuum gauge with each clunk.

I think the valve gaps are too great.  He set them loose (.010 / .012) and I think that causes the cam shaft to transition harder across a single revolution due to the necessary backlash in the timing gears.  Tightening the gap I believe softens the transition across the cam lobe pattern.  You can feel this as you hand crank the motor.  It's like a slight tug left in half a turn then right.  You can feel the crank resist then relax.  PS... No spark plugs in the engine so no compression causing the sound or the resistance. 

I also believe that the lobe pattern of the cam shaft's design is very dependent on this gap setting to smooth out the movement of the cam shaft through one cycle.  When the gap is slightly off due to the setting or wear, possibly expansion from heat (changing the gap) I believe this is what causes the occasional engine sputter.

We will see...
#741
General Discussion / Anyone want to venture a guess.
August 07, 2018, 02:40:35 PM

I have a clunk in the engine and was wondering what you guys might think. I have attached a link to a 44MEG image and sound file for your review.  Depending on your internet connection it will take a couple of minutes to download.  Better to download it first then play the video from your download directory.

http://www.1948plymouth.info/1929/images/IMG_1253.MOV

I sent the link to the builder also ?

Chet...

#742
General Discussion / Re: 29 Build Thread - Part 2
August 04, 2018, 09:16:05 PM
Quote from: Articifer Tom on August 04, 2018, 08:40:08 PM
Looking great Chet ! So the other plates were old style , which you using  ?   Also is carb on right direction , not familiar with the cars ? But love seeing it .

The carb is not correct but I know it works.  And yes the direction is incorrect.

I have the correct brass bowl but will install after I work the bugs out of the motor.

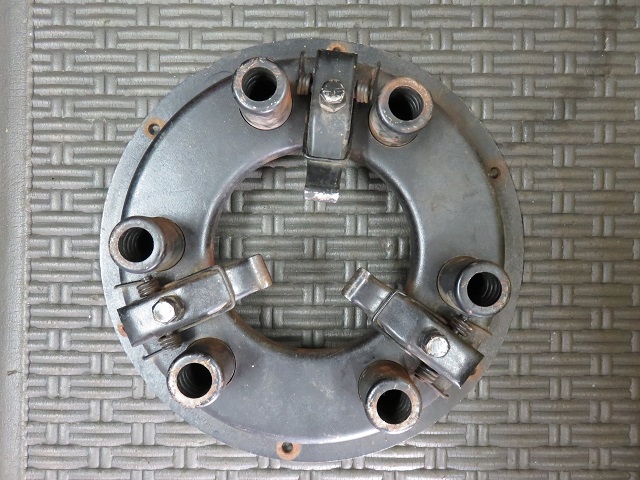
Not sure yet which pressure plate I will use.  The one from Jay appears to be a much better design.
#743
General Discussion / Re: 29 Build Thread - Part 2
August 04, 2018, 07:15:55 PM
Update on Motor & Pressure Plate

Well its been 2 years since this car has been out of the garage so it was nice to roll her out and see it sitting on its own four wheels.  Also cleaning the garage bay was a welcome task.


I ran the engine for a little while but shut it down after 5 minutes because the valves were making a lot of noise and need to be adjusted.  Vacuum was excellent and oil pressure was at max 38-40psi with the vacuum fuel line plugged and the pressure relief valve set to minimum pressure.  I will stabilize this once the engine is broken in a bit longer.  Right now the high oil pressure is a friend.


I used the known good old wiring and carburetor.  Once I stabilize everything I will try the new carb but then again.., I might wait until the car is back from the paint shop. 

Up Date on pressure plates.

I received the new style plate in the mail today and it is in excellent condition and the clutch doesn't look like it has 500 miles on it yet.


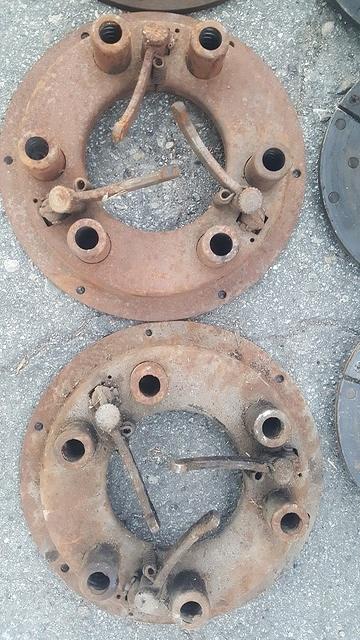
Also purchased the two early Plymouth pressure plates from the AACA post.  Hopefully make at least one good one from the two I purchased and the parts I have left from my original,  Maybe get two goods ones out of the deal, fingers crossed?


Sometimes it seems like two steps forward and one back.., but making some progress.

Chet...


#744
General Discussion / Re: Pressure Plate Located
August 03, 2018, 05:01:57 PM
Quote from: Articifer Tom on August 03, 2018, 04:54:58 PM
Chet, when it rains it pours; found couple more in (parting out ) post .

Yes I know, I've been in contact.  Parts are parts !!
#745
General Discussion / Re: Pressure Plate Located
August 03, 2018, 09:21:08 AM
I haven't ordered one but they seem to be available, not cheep.  see link.

https://hagensautoparts.com/plymouth/13-clutch-flywheel/31123
#746
General Discussion / Pressure Plate Located
August 02, 2018, 10:12:13 PM

Special thanks to forum member Articifer Tom who linked me to a 29 Chrysler owner who had a pressure plate for the 29 Plymouth in excellent shape.  Should be in the mail soon.   :)

But with this being said, at some point these items will dry up.  I have found out much about these pressure plates and many of the venders that supply the rebuilds.  Unfortunately you can't keep resurfacing them forever.   The 4 cylinder Plymouth flywheel is flat so finding a modern equivalent doesn't seem that hard.  You would think that this problem might have had a solution at this point but maybe the demand is to small to make the effort worthwhile.  Might be an opportunity for some reverse engineering.

For those of us like Frank who love to drive their cars this pressure plate issue will come up again.  I was told that the newer style pressure plate can be used in cars from 1928 to 1932.  I think that's a lot of cars still on the road.

Chet...
#747
Great job Frank and congratulations on the #2 spot.

Very impressive.  Will send an update on my quest just to hard to type on this cell phone

Chet.
#748
Hi Frank,

Sorry to hear about your misfortune.  Don't forget about Polarizing the Generator if disconnected from battery.  Haven't done this myself but ask at the meet or check the tech section of this web.  My generator did the same thing and I had it completely rebuilt and the wiring rewound, cost around $300.00.

Maybe while you are at the meet you could inquire if anyone knows of a solution for a pressure plate on the Q & U.  As you know parts are just not readily available.

Tks Chet.., and good luck to you also...

#749
I think your comments are right on.  Yes I do believe the actual pressure plate was reground just one to many times. 

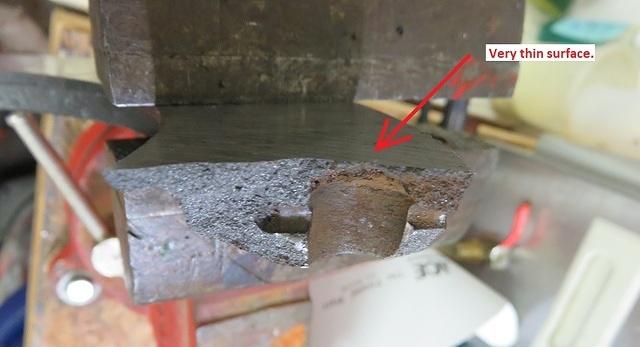
Here is what I think happened.  My first error of not tying the bearing fork back when I hand cranked the motor probably cracked the thin pressure plate where the fork attaches.  In the picture below you can see how thin the surface had become.  Even though I repaired the arm the damage was done.  Like the Titanic it was doomed.  Once I revved the engine the fork let go and the bell housing turned into a blender with the remaining forks and springs as chum. 


I did contact the builder and he contacted the people that did the repair.  They might have a replacement.  We'll see.?

I also have an old Interchangeable parts book [Chilton] from the early 30's.  I could not find any markings but Chilton shows it as EJ10  13 in it's interchange book.

Chrysler Part number:  42233

I believe this pressure plate  (EJ10 - 13) was used on :

1927                     Whippet 93A Rockford Clutch
1928-29                Whippet 98
1930-31                Whippet 98A

1928                     Willys-Knight 56
1928-29                Willys-Knight 70A
1929                     Willys-Knight 56
1929-30                Willys-Knight 70B

1929-30                Marmon Roosevelt
1931-32                Marmon 70

I do think you are right.., it might be a blessing in disguise.  If that plate would have come apart while declutching with the transmission in place and motoring down the road.., I would have suffered more than just a scary noise.  To my surprise the plate didn't fall apart until I unscrewed the pressure plate housing.  So just the small parts were bouncing around.

I will try your recommendation.  Even if the rebuilder comes up with another plate it's always good to have some spare parts.  After all if you have a spare the original part will never fail.  [ Murphy's Law ]

Cheers Chet...


#750
General Discussion / Good News and Very Bad News
July 25, 2018, 05:05:43 PM
Good News is the Goose Neck water inlet is fixed with no leaks.  The silver solder worked out great.

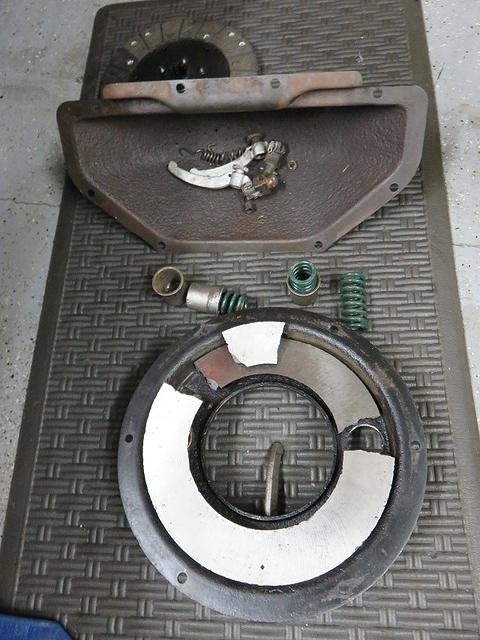
I got the motor hooked up to battery and gasoline and she fired up no problem.  Never got a chance to check oil pressure because when I revved the engine for the first time the pressure plate exploded.  Not a noise you want to hear after spending a fortune on an engine rebuild.  It sounded like the motor was tearing itself to bits.  The bottom of the bell housing dust pan was filled with debris. 

I removed the clutch and pressure plate and here is what was left.


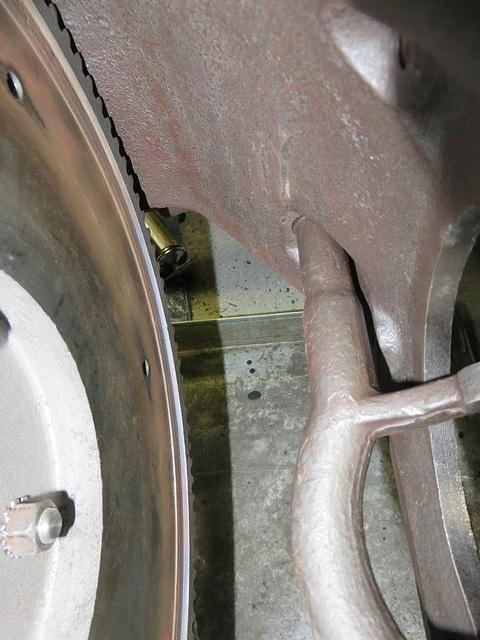
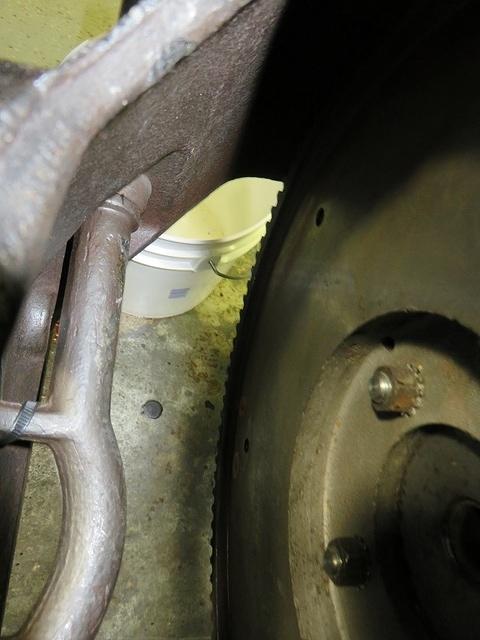
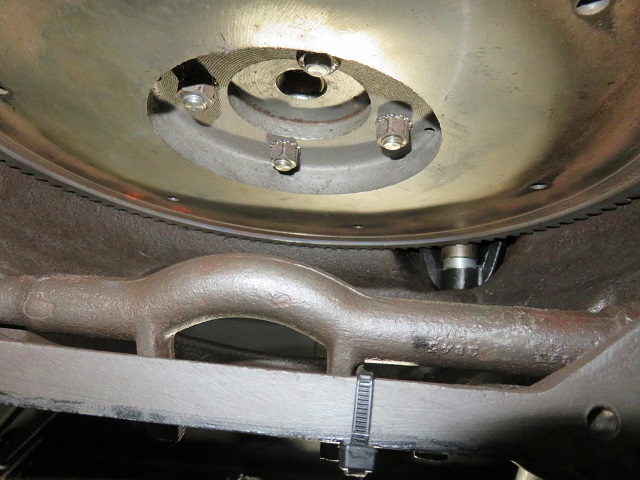
The clutch and flywheel were not damaged.  I thought that maybe the arms hit the fork for the throw out bearing but didn't see any damage or any indication that the arms came in contact with the fork.  The following pictures are shot from looking down to the right and left of the bell housing and the last picture is looking up from underneath the bell housing.  The fork is tie wrapped in place with no apparent marks from the event.


I guess there is a limit to how many times you can rebuild a pressure plate.
So now I need to source a solution.  Any suggestions ??

Not having a lot of fun at this point !!