The Roof Bows
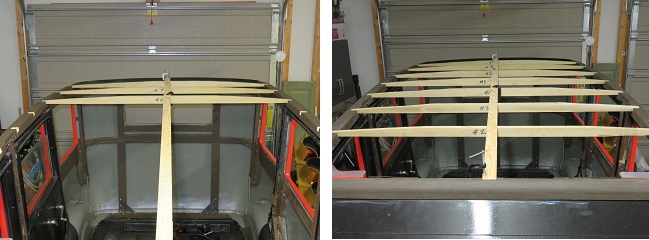
After a little research and some help from other Plymouth owners I was able to create the diagram below which shows the placement of the roof bows. The actual measurements are from a surviving original 29 Plymouth U roof.
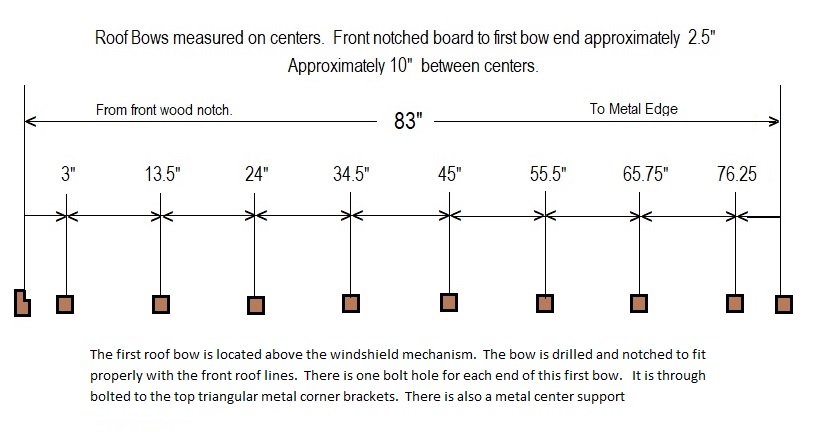
Since the headliner seams attach to the roof bows it was important to determine their actual location so that the new headliner will look identical to an original headliner once everything is installed. If the bows are not placed in the correct locations the seams for the headliner will wind up in different locations. Installing these bows requires the same amount of work to do them correctly as it would to place them incorrectly. It's better to take the time to research the correct placement no matter what type of car you are working on. Going back to fix something later is always a bigger job that doing it right the first time.
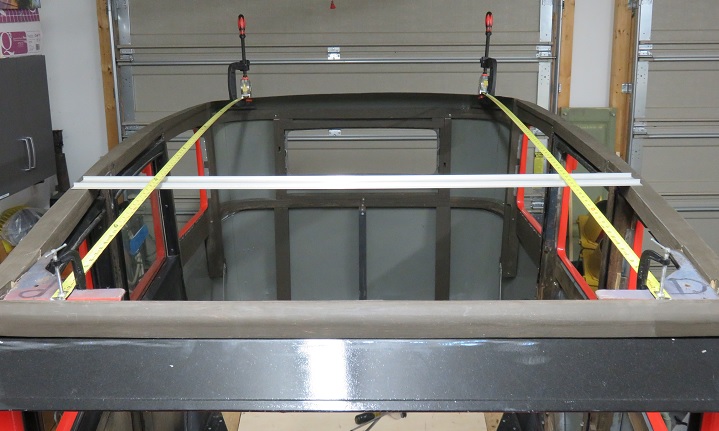
In order to layout the proper location, I clamped two Tape measures on either side of the car. Using a straight edge set to the proper measurement on both the left and right sides of the car, I marked the top roof wood for drilling.
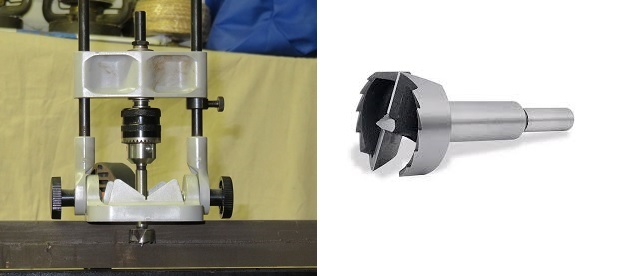
I will be cutting out a 7/8" wide 3/4" deep recess in the roof top wood to allow for the 3/4" thick hardwood roof bows. In order to achieve accurate depth and position I will use a 7/8" Forstner Bit and a hand drill guide to create a rough hole. Once done I will square the front of the slot with a Multi-Max Dremel tool.
The first step in recreating the roof was accomplished without issue. Creating and fitting the bows will be time consuming. Each bow will need to be fitted and adjusted in order to properly shape the roof. The rear four bows are similar but will have a greater side to side arc than the front which start to flatten out as the roof gets close to the windshield.

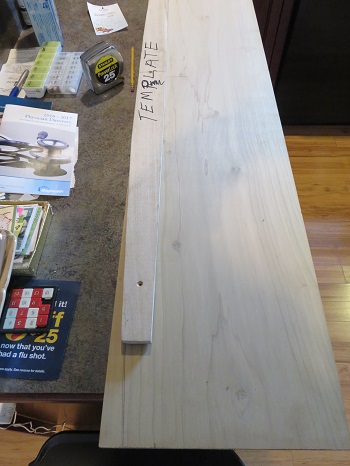
In order to set the front to back shape I will install a lath board from the windshield top frame to the last bow near the back of the car. I will then fit the center or #4 bow to ensure the proper arc from front to back. I will do this by installing one center lath to form the desired front to rear shape. Once this is accomplished I will hand fit each of the bows to maintain the proper roof line. Remember I already have a left to right template for the roof bows which I created from the roof line of the rear skin. There is a slight left to right arc which flattens after the fourth bow from the rear.
Please keep in mind that the construction materials and process are close but not a direct one for one copy. The main goal is to complete this process with an acceptable and correctly shaped roof. More attention was paid to dimensional rather than structural accuracy.
 |
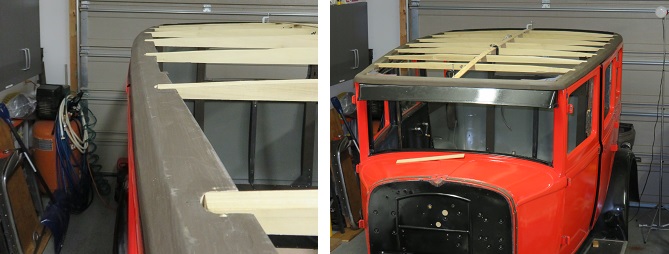
I created the Bows from a single piece of hardwood. I used my roof template to layout the slight left to right side arc. Since the interior roof is square to the sides this allow me to determine the depth of the Bow and then simply rip the finished Bow on the table saw. I worked my way up from the rear to the front. I only had to slightly flatten the roof arc on the last three bows in the front of the car. The first Bow under the windshield mechanism is basically flat and is bolted to and directly under the triangle corner brackets of the front door hinge pillars. Bow 4 Reduced 1/16 inch Bow 3 Reduced 1/8 inch Bow 2 Reduced 3/16 inch Bow 1 Hand fitted basically flat. |
In the original construction the surrounding roof rail was at the same height as the finished lath boards. In my case I will be adding side rail material to match the height of the lath boards. The overall dimensions will be correct but the construction method is different than an original roof. The construction method for production line assembly had to be easer but in my case I am only building one car with unlimited time. It would be great to have already manufactured pieces.
There is still plenty of work to do before this section is marked completed.
-
Fasten down all roof bows and sand to smooth out roof lines.
-
Create the roof bow above the front windshield
-
Create the roof member that secures the lath boards at the rear of the car.
-
Create and fasten the dome light board.
-
Install the lath boards.
Much to do but the car is starting to take shape again. Once this, the door wood repairs, and the metal work is done it will be off to the painter before anything is reinstalled.