Speedometer Repair
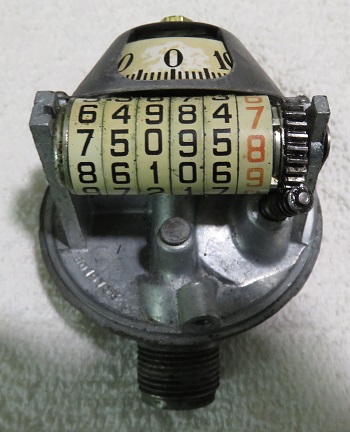
PLEASE NOTE: I don't recommend doing this type of repair unless you have a spare speedometer like I did. Since my original speedometer was seized and I had a replacement I decided to give it a shot. This is a very delicate device that works on centrifugal force to move the top display dial. The dial is spring loaded to return to zero and is calibrated by adjusting the proximity of the dial to the drive wheel. How much slip will determine the MPH speed displayed but not the odometer reading.
ALSO NOTE: The odometer will accurately record mileage no mater what the speedometer dial displays as the current speed. The odometer is driven directly by the gears in the assembly and is defined by the turns of the transmission key and cable.
After I installed my original speedometer I realized that it had seized and broke my speedometer cable. I decided to take it apart and try to clean and free up the drive mechanism. As noted above, if I am unsuccessful, I have a replacement speedometer.
|
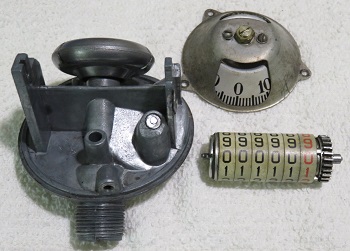
Pictured on the left. I removed the assembly from the casing. It was clear that the center shaft and gear mechanism was jammed and very hard to turn. This is what damaged the cable which is wound spring steel. The cable literally unraveled at the transmission key. I then removed the three screws on the display wheel assembly and removed it. The odometer wheels can be removed by removing the pin which runs through the assembly. |
 |
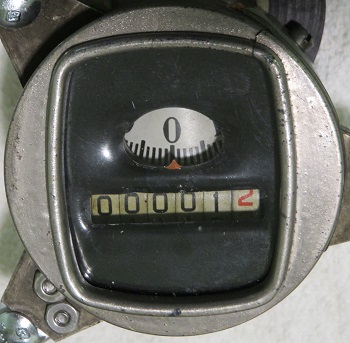
The odometer wheels came apart as a single assembly. Once removed from the main assembly only the drive wheel to the right will come apart when you remove the pin. I decided to reset the wheels to Zero. Since my engine was just rebuilt and with the restoration still in progress, what better time to do a reset. I have no idea how many original miles are really on the car because the speedometer was broken when I first acquired the car some 14 years ago.
Note: The drive gear of the odometer fit quite nicely into an 11/16 twelve point socket. Using my variable low speed drill to drive the socket, the odometer was turned back in short order. Very Important.., Be careful while doing this. The wheels move fast with each turn of the drive wheel.
Since all the delicate parts of the speedometer assembly are removed I decided to drop the assembly in my ultrasonic cleaner and see if that will loosen up the drive shaft. I set the temperature on the ultrasonic cleaner to room temperature roughly 70 degrees Fahrenheit and cycled for 30 minutes. The assembly looked clean but was still tight and hard to turn.
I decided to remove the cover on the rear of the speedometer assembly. See picture below:
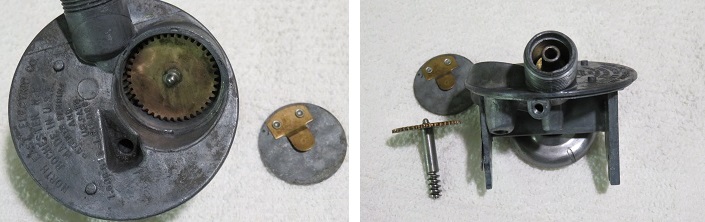
I removed the brass gear and screw shaft. I cleaned everything I could see with a Dremel tool using a soft brass wire brush at low speed. With both the front and rear oil caps removed I soaked the assembly in industrial parts cleaning solvent for approximately 24-36 hours. Unfortunately this had little to no effect other than to make everything look even cleaner.
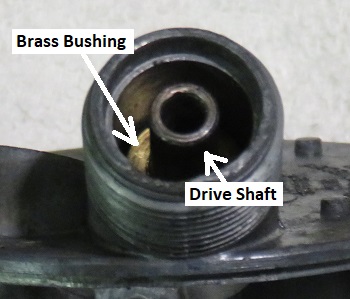
| After examining this
drive shaft from all possible angles I couldn't see how it was
originally assembled. No screws to loosen so the only
thing I could figure was the the brass bushing was pressed unto the
drive shaft. This was the only possible moving part that
I could influence. I decided to tap the drive shaft down which will in effect move the bushing to a higher point on the drive shaft. Assuming that the bushing is bottomed out in the casting. Since this assembly is pot metal I held the assembly in my hands and lined up a punch rod over the drive shaft. I had my son-in-law tap gently with a small hammer. Well after two well placed taps, the shaft moved slightly which freed up the drive shaft. I could now feel some very slight forward and backward movement of the drive shaft. Just enough backlash to spin properly. |
 |
 |
I reassembled the speedometer and advanced it to a minimum of one mile. Apparently if driven in reverse the dial will not turn past all zeros to 99,999.9. I wanted to ensure that this couldn't happen after reinstalled into the car. I did this because from what I could tell, the speedometer will drive backwards in reverse and will damage the wheels if driven backwards past the zero point. Both this speedometer and my spare will drive to 20 mph using my drill in low speed driver mode. After reassembly, the speedometer worked as expected. It drove smoothly up to 20mph using my variable speed drill. |
Next on the checklist is to install the speedometer, replace the broken speedometer cable, and install the drivetrain/parking brake assembly.