Fenders/Running Boards & Lights
Installing the Driver's side front fender and running board required a little more tweaking than the passenger side. I had to keep everything bolted in, but loose in order to locate the light bar and all components including the running board. I needed to loosen the rear fender and reposition it slightly in order to align it properly. I centered the radiator between the fenders and ensured that the light bar was exactly parallel to the ground. The end result of this effort was excellent.
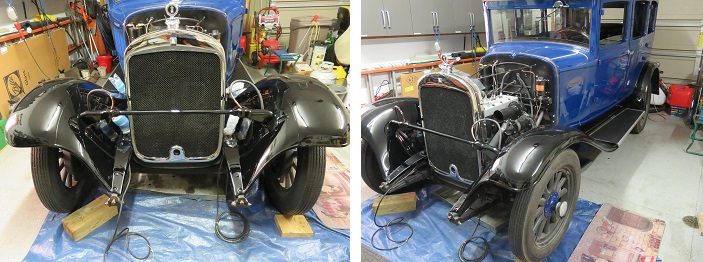
I will have to pull in and adjust the radiator arm supports. It looks like the radiator is to far forward near the top. This will have to wait until I install the hood.
Next on the agenda is to install the sheet metal trim below the radiator, then install the front bumper. The metal trim installed without issue. The Bumper on the other hand presented some challenges. I guess after years of being off center caused by miss alignment to compensate for the broken passenger front spring, I believe made it more difficult to install. Also it might have been slightly bent in on the passenger side. After a number of swaps between the upper and lower bumper we finally found the sweet spot. With the aid of some 'C' clamps to persuade the parts to align, things finally pulled together to produce an acceptable conclusion. see pictures below.
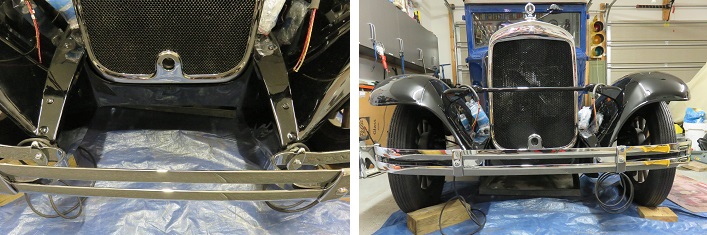
Yes I know all my front bumper parts were chromed. Initially when I bought my car this was the case. I only found out after the chroming process was complete, that some of these parts were originally painted black. Since it looked good before I had these parts chromed. It looks even better after the chroming was completed. I didn't see any reason to destroy the beautifully mirror finish to apply black paint. Between the reflections from the freshly painted body complimented by the mirror finish on the chrome makes it hard to photograph.
When I had the wiring harness made up I had them added a 7 wire flasher system to the original wire harness. This allows for independent rear removable signal lights and front turn signal lights. Below is a picture of fender mounted fog lights that I am using for turn indicators.
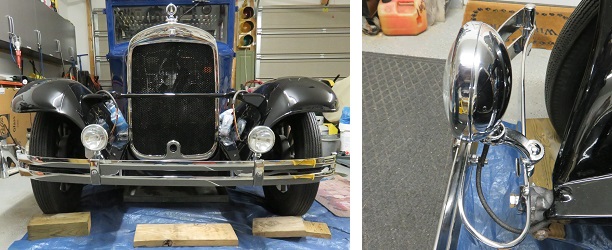
These 6vdc fog lights were too bright to be used as signal lights and came with H3 6vdc Halogen 35 Watt bulbs. Of course this is two bright to work as signal lamps. So what do you do ?
I reviewed a number of modifications and decided to replace these bulbs with H3 12vdc 55 Watt bulbs. This worked out great. Using the 12vdc bulbs in a 6vdc system reduced the light output in half maybe a little more than half but just right for signal lamps. The best part is no modifications to make this work. The H3 12V and 6V have the same form, fit, and function. Knowing this now, I would have ordered the lights in 12vdc rather than 6 volt. Polarity (Positive or Negative ground) makes no difference for DC lights. No Plymouth parts harmed or damaged. The new lights clamp on to the bumpers. Picture above and to the right.
The headlamp buckets were chromed with the rest of the exterior parts. I will be rewiring them and fixing the connection points. I had previously hardwired them just to make them functional. I had used the parking lamp inside the headlamp bucket to work as a signal lamp. For this restoration I will be setting these buckets up as manufactured and rebuilding the lamp disconnect plug and socket. I have all the main parts but they are in very poor condition. I'll be using parts from the remanufactured lamp set made for the 1928-29 Model A Ford legacy 2 bulb headlight set.
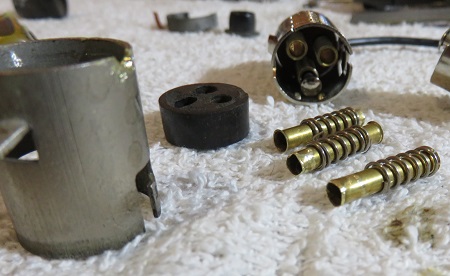 |
In the picture on the left starting on the
left is my Plymouth lamp socket. Next is the black Bakelite
pin insulator. The ford socket is similar but slightly different so my Plymouth plugs will not match up. Of course I could use the Ford plugs but that would be a modification. What I did was remove the pin tubes and springs from the ford socket and use these to repair my Plymouth socket shell. I needed to shorten the springs by cutting them in half to compensate for the thickness of the Bakelite insulator. The wire pins are then threaded through these spring loaded tubes. |
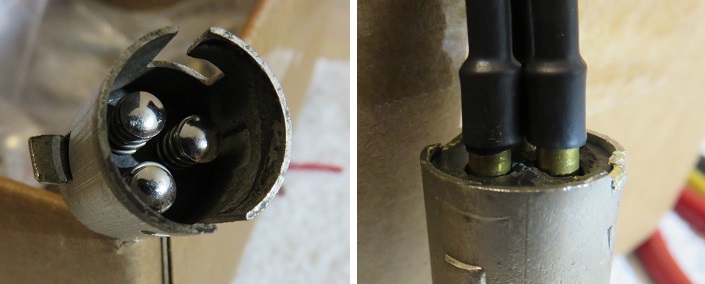
The picture above and to the left shows the headlamp pins properly located in the old Plymouth socket. I set these in place with a couple of shrink wrap sections around the pin wires. I added additional shrink wrap around these wires and the pin tubes to set the pin tubes in place. I did this to the socket without the connecting plug installed, but with a little tension on the pins to remove slack.
The picture above and to the right shows the rear of the socket with the plug connector installed. All three pins make good strong contact. When the plug is disconnected, the pins will only spring forward until the shrink wrap reaches the Bakelite insulator. This was by no means an easy task and took a good deal of time to repair this plug and socket assembly.
These headlights are just eating up a huge amount of time. Yes the rewiring is tedious but an additional problem is the plating. The plater also repaired the headlight rims that hold the lens in place. Although the outside looks great the inside had too much material. I had to grind the inside of the headlight rim to allow the tension ring to catch the headlight bucket properly. This was another tedious task because I was afraid that continued grinding might heat the outside chrome surface and turn it blue. I did this work slowly and was able to clean up the lamp rims and finish the headlight installation.
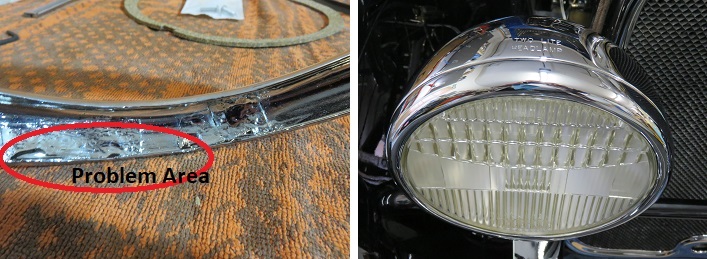
In the picture above and to the left, you can see where these solder lumps inhibit the tensioning ring from aligning properly against the rim edge. I used a 5" disk grinder with a 1/4" thick stone wheel to remove the lumps and flatten the edge. I finished the fine grinding with my AC powered Dremel tool although the disk grinder did an excellent job. The picture on the right is the result of this work.
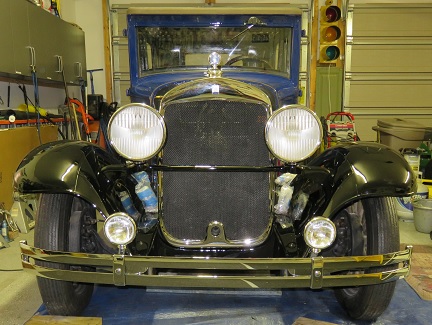
Looking more and more like a car again !!!
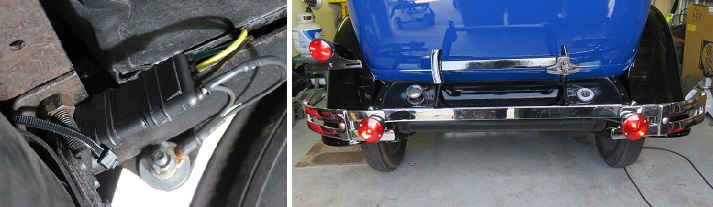
All that's left of the exterior assembly work is the rear bumper and lights. The bumper installed easily in comparison to the front bumper. Here again items that were originally black from the factory were chromed. May knock off a couple points at a POC show but looks to good to destroy the beautiful chrome finish and replace it with black paint.
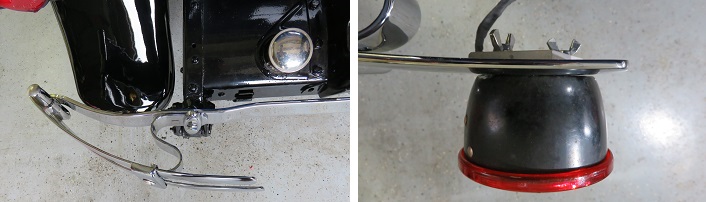
My rear lights are part of the flasher system and provide running lamp, brake, and flasher function. In the picture above and to the right you can see that the light is held in place by an aluminum plate and two wing nuts. These lights can quickly be removed for an average car show. The picture below and to the left shows the standard trailer light plug which is beside the gas tank on the drivers side. Two tie wraps and the lights can be easily removed.
This concludes the exterior reassembly work. I need to finish installing the remaining glass and wire the overhead cabin light. Then we will start the interior. Headliner first, followed by the exterior roof surface, then the interior.