Glass & Interior
Except for the roof all the exterior mechanical work is completed. It's time to get started on the interior. I had previously finished the windshield and 3 of the 4 doors. I spent some time attending to items that were passed over like installing window stops on the doors that were completed and installing the glass in the driver's side rear passenger door which is the last of the 4 doors.

This work isn't complicated just slow and tedious. Before installing the window tracks and glass I glued a black rubber weather strip to a 3/4 inch, thin aluminum strip which replaced the old steel weather channel. It finishes off the exterior look but it isn't all that efficient at keeping the rain out of the doors. That is if the car ever sees rain which would only be an infrequent unforeseen accident.
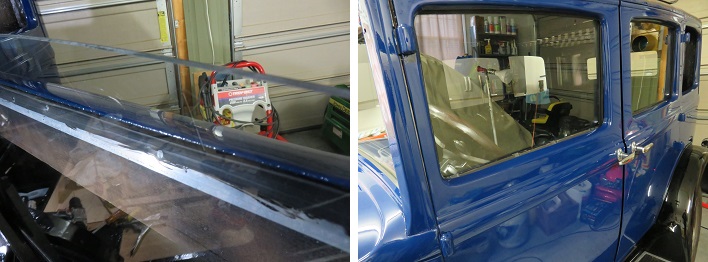
In the picture above and to the left you can see my makeshift weather strip through the window glass. When the window frame moldings are on, you can't see the aluminum strip. The picture above and to the right shows the last of the doors completed with the exterior handles installed.
Working on the interior may be slightly disjointed. The reasons for this are many including cleaning and refurbishing small parts over numerous days plus delays for ordering needed material. So with this being said I will be moving from task to task basically attacking areas as materials and situations allow. I have three windows left to install the two rear seat windows and the rear center window. Unfortunately I still haven't found the rear window. Most likely put it in a really safe place.
I started cleaning up the window glass for the two rear seat windows. I had replaced all the door glass but I am trying to use the rear window glass even though it has seen better days. Interesting enough the window glass shows that the car was painted blue prior to the red. This leads me to believe that maybe the original color of my car might have been all black. At this point it is very hard to determine, but overspray on the glass is blue below the red. So I have probably painted this car for the 4th time. Originally whatever that was, Blue, Red, and finally my new coat of Blue.
While cleaning and finding parts for the rear seat windows I decided to fabricate and install the toe board. It became obvious to me that with all the pedals and transmission equipment installed, doing this board in one piece would not be a good option for future service removal. Not knowing what the original toe board looked like this is what I did.

I used cardboard to make two exact templates which I will use to fabricate the 3/4 inch plywood I am using for the toe board. This is what I had left over from the floor. The edge angles were 8 degrees off center and the toe board to floor angle was approximately 131 degrees. My saw gauge is probably off a degree. Of course I cut a piece of scrap wood to check the angles first before ripping the good stuff. The picture above and to the left is my two piece template. The split is between the gas pedal and the high beam switch. Also I am using the section piece in the picture above and to the right above the steering column. Once everything assembled properly I drilled the screw holes and painted the underside of the toe boards.
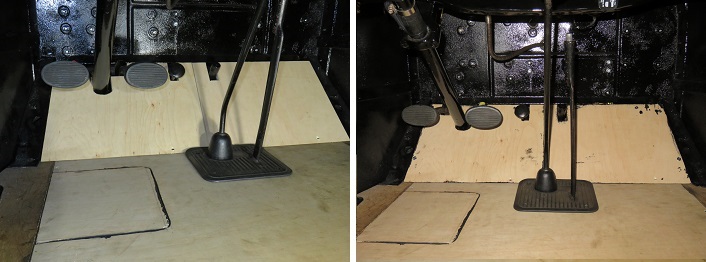
The picture above and to the right is the installed toe board. the picture on the left is the fitted pieces before painting the exterior side. Since the interior floor will be covered with rubber mat in the front and carpet in the back I am not taking much care with paint bleed. If I decide to put a weather seal coating on the floor I would probably give it a light sanding before applying the sealer.